


 Here I go, starting another weekly feature. Honestly, I think I just like making up buttons. But seriously, it's a good way to keep me posting every week and giving me a consistent topic to write about.
Since I'm often asked by other bloggers, both newbie and seasoned veterans, about some tech-related issues, I thought I'd post something every Tuesday about how to improve your blog in a technical way. I designed my blog myself within Blogger, after some frustrating Google searches about widgets and HTML modifications that drove me nuts. It's truly a work in progress, and I'd like to share some of the things I've found with you so that you can tweak your blog to your liking. It helps that I'm married to a Unix administrator (computer guy), so when I really get stuck, I can bribe him (with sex) to fix what I've messed up.
Today, let's talk about buttons. Yes, I make them, you make them, but what do you do when you want to share them? You often see those little boxes of HTML text that you copy and paste into your blog layout, but how do you actually get that little box onto your blog? (here's my box below)
After you've uploaded your button image, either in .GIF or .JPEG form, you'll see a section of HTML code under the image, at least this is the case in Photobucket
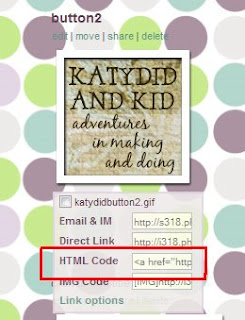 Here is my button (a .JPEG) on my Photobucket page. The HTML code I'm referring to is in the red box. This is your button code, which will eventually be what's inside that white box on your blog. We'll get back to this code later.
In order to get that box to appear on your site with the code for your button inside it, you'll need yet another string of HTML code. I use this one"
<textarea rows="8" cols="15" name="textarea" wrap="VIRTUAL"><a href="http://katydidandkid.blogspot.com" target="_blank"><img border="0" alt="button2" src="http://i318.photobucket.com/albums/mm402/Katwalck/katydidbutton2.gif"/></a></textarea>
There are many others out there that you can find via an online search, but this one is the shortest and sweetest that I've come across.
Rather than copy this exact code from me, you'll need to modify it, otherwise you'd just get my button to appear on your site. When you change this code, be careful of changing only what I tell you to. The omission of even a quotation mark can make this not work.
The first thing you do is copy the HTML code that is under your photo (see my screen shot above with the red box surrounding the place where the code is) and paste it in place of the section of the code below that is boldfaced
<textarea rows="8" cols="15" name="textarea" wrap="VIRTUAL"><a href="http://katydidandkid.blogspot.com" target="_blank"><img border="0" alt="button2" src="http://i318.photobucket.com/albums/mm402/Katwalck/katydidbutton2.gif"/></a></textarea>
The next thing you'll need to do is change is the URL address inside the first set of quotation marks. You'll see two URL addresses in the code, and you'll only be changing the first one. You will type your URL address there, making sure to keep the quotes around it. Your code will look something like this, with you URL typed in there where you see "YOUR BLOG ADDRESS HERE" typed in the code
<textarea rows="8" cols="15" name="textarea" wrap="VIRTUAL"><a href="http://YOURBLOGADDRESSHERE.com" target="_blank"><img border="0" alt="button2" src="http://i318.photobucket.com/albums/mm402/Katwalck/katydidbutton2.gif"/></a></textarea>
If you don't change this code in the HTML generated by Photobucket, it will just take your readers to your button image on the Photobucket site, and of course you want them to come to your site, not your Photobucket page!
Then leave everything else as is. In Blogger, you'll open up your layout page, and add a Gadget and choose HTML. Copy the entire code, paste and save. This will make that box with your code inside it appear on your blog. Then, from your blog's main page, copy the code from the box and add your button to your layout, just to make sure the code works.
So that's it! Good luck with it, and email me if you have any questions. Stay tuned next week for instructions on how to take a screen shot and use it as an image. Great for random number generator winners.

<textarea rows="8" cols="15" name="textarea" wrap="VIRTUAL"><a href="http://katydidandkid.blogspot.com" target="_blank"><img border="0" alt="button2" src="http://i318.photobucket.com/albums/mm402/Katwalck/katydidbutton2.gif"/></a></textarea>
There are many others out there that you can find via an online search, but this one is the shortest and sweetest that I've come across.
Rather than copy this exact code from me, you'll need to modify it, otherwise you'd just get my button to appear on your site. When you change this code, be careful of changing only what I tell you to. The omission of even a quotation mark can make this not work.
The first thing you do is copy the HTML code that is under your photo (see my screen shot above with the red box surrounding the place where the code is) and paste it in place of the section of the code below that is boldfaced
<textarea rows="8" cols="15" name="textarea" wrap="VIRTUAL"><a href="http://katydidandkid.blogspot.com" target="_blank"><img border="0" alt="button2" src="http://i318.photobucket.com/albums/mm402/Katwalck/katydidbutton2.gif"/></a></textarea>
The next thing you'll need to do is change is the URL address inside the first set of quotation marks. You'll see two URL addresses in the code, and you'll only be changing the first one. You will type your URL address there, making sure to keep the quotes around it. Your code will look something like this, with you URL typed in there where you see "YOUR BLOG ADDRESS HERE" typed in the code
<textarea rows="8" cols="15" name="textarea" wrap="VIRTUAL"><a href="http://YOURBLOGADDRESSHERE.com" target="_blank"><img border="0" alt="button2" src="http://i318.photobucket.com/albums/mm402/Katwalck/katydidbutton2.gif"/></a></textarea>
If you don't change this code in the HTML generated by Photobucket, it will just take your readers to your button image on the Photobucket site, and of course you want them to come to your site, not your Photobucket page!
Then leave everything else as is. In Blogger, you'll open up your layout page, and add a Gadget and choose HTML. Copy the entire code, paste and save. This will make that box with your code inside it appear on your blog. Then, from your blog's main page, copy the code from the box and add your button to your layout, just to make sure the code works.
So that's it! Good luck with it, and email me if you have any questions. Stay tuned next week for instructions on how to take a screen shot and use it as an image. Great for random number generator winners.


21 comments:
You so rock. I put up my button today, thanks! There are so many bloggers looking for this.
Lisa
Wow, thanks for the tutorial! I was wondering about this very issue recently! :)
This is EXCELLENT, Kathleen. People email asking how to do this all the time. Now I know where to send them.
This Tech Tuesday is such a fabulous idea too!
I have a question for you........how do you get the tabs under your header going across. I want to clean up my side bar and have my blog look nice and clean like yours.
Errrr.... This makes me feel like a complete knob. I am pretty good with computers (at least as far as my line of work measures it...), but this is absolutely beyond me. I was years ahead of all the others in making web pages and all that. And I decided long ago I didn't need to learn html as long as I had a good editor which could do the job for me. It never occured to me (and how could it???) that I would want to make my own stuff someday? Now what? I don't get this at all... I can't even figure out how to track my stats on google analytics LOL! But I do have a cool cloud tag! (: Ah well, we all start somewhere, right? (-:
I'm sure this will help SO many wonderful bloggers :)
What a charitable post! This is such an easy to understand explanation of how to do that! I somehow managed to figure these out on my own, but I was never able to add the scrolling features to mine. Now I can! You rule as usual.
It's great that you have this on here but I tried for over 2 hours to get it to work and still couldn't...guess I'm not really good when it comes to computers. Thanks anywho.
I've had some readers asking me how to make a button on my blog. Now I can just send them your way! Thanks!
Great post Kathleen. Something that everyone can use. I remember when I was first figuring out my button. I did it one my own. Having some help like this would have been great.
Awesome post!
Love and Prayers,
Tim
I sure appreciated your help on this the other day! I'm glad you posted it - now I can reference it again! Man, what a time I've had with this stuff. Keep up these sorts of posts! I think it's a wonderful addition. I'll be following your Tech Tuesday CLOSELY as I need all the help I can get!!!
You are awesome!! I need to make a button now.
I just had to put up a blog about you and all your help. <3 Thanks again.
http://daughterandfurbabies.blogspot.com/2009/02/thanks-to-katydid-and-kid.html
You are my hero!!! I've always wondered how to do this!! And I really like your point by point instruction!!
thanks i've been wondering about this. someone made my button and the box but it bugged me that i didn't know how.
mext question i've been trying to find is how to i make a scrolling item. like to scroll all the buttons of other blogs i've collected so i can keep adding buttons without making my blog 80 miles long.
Thank you, thank you, thank you!
Thank you! I've tried doing this 3 times and failed. You instructions actually worked. Perfect!
You rock! Thank you!!!
Oh and you can find my tribute to your helpful genius here: http://justanothernewblog.blogspot.com/2009/07/grab-my-button-for-extra-credit.html
Thank you so so much! I did it on my first try and I am not too computer savvy!! :D Excellent instructions!
kathleen,
your instructions rocked and I made a button for my fall bonanza, but.....
how do i get the little box like you have for pasting the code for others to copy to their blog? i got my button up, but can't get it to leave code in text box for others to copy-keeps making the same button...help!
Thanks
Thank you! I could not figure out how to get that scroll picture on my blog. I had already developed the badge.
Post a Comment