Rather than create a straightforward turkey design for last week's theme, I decided to take inspiration from one of our family's turkey day traditions--the wishbone.
This part of the turkey was anticipated by my brothers and I every Thanksgiving. As kids, we would fight over who got to break the wishbone, and the possibility that our wish (for candy or toys, usually) would come true.
Using the coptic stitch, I bound this book together and sewed on a felt cover complete with a wishbone and the simple word "wish."
~Felt (at least 3 colors--I used white for the wishbone, blue and green for the background)
~Coordinating colors of DMC Embroidery floss
~Scissors
~Book board or heavy cardboard
~Awl or hammer and nail~Tacky glue
~Linen cord
~Blunt needle
~Copy paper (25-50 sheets, depending on how thick you want your book)~Paper cutter
1. Decide on the size you'd like your book to be. I made mine 7" square, but it might be easy to make your book 9"x6" so that you can simply fold your copy paper in half for the pages, rather than having to cut it on a paper cutter.
2. Cut your book board/cardboard to size, making it slightly larger than the paper that will be inside. In my case, the cover was 7"x7" and the pages were 6 1/2" square.
3. With the color felt that you'd like predominantly on the cover (in my case, green), cut a square (or rectangle) one inch smaller than the cover board. I cut mine with pinking shears for a zig zag edge. Onto this piece, you'll stitch a wishbone shape, which I cut out of white felt.
4. I also embroidered the word "wish" along the edge of the wishbone, then pinned the green panel to a blue felt background...
and stitched the entire panel to a the blue felt. This entire piece will wrap around the front cover. I made sure the blue felt was at least 4" larger than the cover board so it can wrap around the sides.
5. Lay the embroidered felt piece face down. Spread glue on one side of the book board and lay it on top of the blue felt, making sure it's centered as best as you can.
6. Fold the corners in, glue them down, then fold the sides in and glue them too.
Thread some yarn/floss and tie a knot on the end, then sew the sides together to hold them in place.
7. Do the same thing on the other two sides, then cover it with a square of white felt, which is large enough to cover the edges.
8. Make another cover for the back, omitting the green panel sewn onto the blue felt. I embroidered a little wish bone on my back cover before gluing it down.
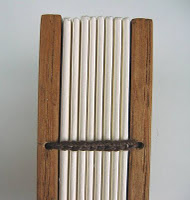
9. Once both covers are finished, you'll prep your paper for the inside. My book was 7" square, and my pages were 6 1/2", so I needed to cut 50 sheets of paper 6 1/2" x 13" on the paper cutter. Then I divided the paper into 5 stacks of 10 sheets, which created 5 signatures of paper that will be sewn together. A signature is fancy talk for a folded section of pages that are sewn together to create a book. I wanted my book to be 100 pages, so I needed 50 pages, folded in half and bundled into 5 signatures. You can see an example below of the folds of the signatures sewn together along the binding.
10. You'll need to make a paper template for punching the sewing holes through your paper and cover. Measure 8 evenly space holes about 1" in from each end and
11. It's time to move onto the sewing! You'll need about 30" of waxed linen thread with a large knot on one end and threaded through a blunt needle.
Of course as I usually cram to finish the book for the challenge (sounds a lot like college), I neglect to take photos of myself sewing the coptic stitch, so I'm directing you to another site for that. I've sewn these books by the dozen and could probably do it with my eyes closed, but frankly, I'm tired and scatterbrained.
I did however take a few photos of the cover being prepped. I punched the holes for sewing along the edges of the covers, about 1/2" in from the edge.
Here's the back cover being punched and ready to be sewn to the rest of the book. One starts by sewing the first signature to the front cover, then adding signatures and ending with the back cover.
Then you knot the cord on the inside of the book and you're done.
I'm really going to try and get some photos of myself doing the coptic stitch, but it's just been so hectic around here, plus working on the next project. I apologize for a half-@*5-ed tutorial, yet again.
It does make a really nice journal/sketchbook, since you can open it 360 degrees. And it's cushy and fuzzy too!


Congrats on making it to the next round. I have no doubt that you will take the big prize... there is a big prize right?
ReplyDeleteI'd fill my book with bloggers I am thankful for... you'd top the list.
Aw, how adorable is that?! Thanks for the tutorial!!
ReplyDeleteI want to be adopted by you. Truly inspiring.
ReplyDeleteOh I think that is just SO cool! I saw that and immediately thought you were the brains behind that submission :)
ReplyDeleteI love the color palette... it matches your blog!
ReplyDeleteCute little book! I have been trying to get on So you think you're crafty site all week. A computer threat keeps coming up! And I even tried my computer at work. Weird.
ReplyDeletewondering what the other crafts look like. Maybe they are having problems?
Keep up the good work!