February 21, 2024

Eggcellent Flowers

I can hardly keep up with what day it is, as of late, but we still manage to make things and be creative throughout the day.

When trying to sort through the massive pile of recycling that has been haunting our kitchen, I came across some egg cartons that were begging to be used.  I've painted animals with students in the past, but didn't have the energy to deal with the inevitable frustration that accompanies such a complicated craft (complicated for the mind/eye of a 4 year old).  So we just made some simple flowers.

Forgive me for not photographing the entire process.  The neighbor kids were over, so all required my assistance and encouragement through the project.
You'll need just a few materials:
  • paper egg carton
  • paints/brushes/water
  • scissors
  • stapler
  • pipe cleaners

STEP ONE

Cut apart your egg carton, trimming each "cup" so that the top of it is fairly even.

STEP TWO

Cut slits around the edges toward the center circle of the cup.  Don't cut into the circle, just to its edge.  Then spread out the flower "petals".

STEP THREE

Paint!  We used tempera, but other types would be fine too. Watercolor would make a paler tint than something like acrylic or tempera.

STEP FOUR

When dry, staple a pipe cleaner to the flower to act as a stem.  You could add paper leaves, or bend other pipe cleaners to make the leaves.  Then display in your favorite vase.  No wilting or allergies!
Happy creating!

Wee Felt Worlds: Sweet Little Scenes to Needlefelt

I can't resist books on fiber arts.  Whether it's knitting, sewing, embroidery or felting, I love working with all kinds of fibers and fabric materials.

When these kind of books relate to kids, that's a bonus for me.  Not only can I enjoy the process of making something, but it can amuse my kids of those of friends, either in its final result or in the creation of the object.

Wee Felt Worlds: Sweet Little Scenes to Needle Felt by Amanda Carestio is a new, adorable book from Lark Crafts that focuses on needle felting.  And the projects included in the book are so stinkin' cute!
Using dyed, combed wool, you too can create these magical little scenes.  I have a stash of carded wool in my art supplies, so I'm quite eager to create some of these little creatures and settings for myself (forget the kids, I want these.  And without grubby fingerprints on them).

How sweet is this little woodland scene?  Felt and wool seems so fitting for the natural setting.
Any of these felted scenes would be a magical gift that encourages imaginative play in a child.

The Circus Maximus scene is also very cool.  I like the look of the characters (designing figures always stumps me, 3-dimensionally) and I like that the instructions are easy to follow for making one's own.
Prior to reading this book, my understanding of needle felting was cursory, at best, but having read through Wee Felt Worlds, I have a better handle on how to create items out of wool (appendages had always puzzled me).

While the book may intimidating for some in terms of securing the materials needed (really though, so much can be found online now), once you have the wool and a few tools, you're set.  The step-by-step techniques will hold your hand through the whole process.  Kudos to the author for explaining it so well, and also adding helpful illustrations throughout. 

With over 50 projects to make, there's something for everyone's taste in Wee Felt Worlds.  And for around $8, it's a beautifully illustrated, informative book on a craft that you might want learn more about.  You can purchase it via Barnes and Noble.

Why not try this sample project, for a Squirrel, as seen below (just click on the photo, then right click to enlarge).  Enjoy!

Disclosure: I received a sample copy of Wee Felt Worlds for review purposes. 

February 13, 2024

And in the End...

On the eve of St. Valentine's Day, our house is sprinkled with hearts.
I tend not to get entangled in the Valentine's day hoopla (flowers, candy, etc.) but it is nice to reflect on those we love and whom we're grateful for in our lives. 
Red and pink paper brings some cheer into our house, especially during this longest-shortest month that is February.  The cold days seem endless, though punctuated with an intimacy that brings us all closer together.  Sometimes it's too much to bear ("could you boys just STOP hanging on me!"), but we manage while longing for days spent in the dirt and grass.

I can't help but hear the melody and lyrics from The End, on Abbey Road.  It's a nice mantra for getting through a rough day.
"And in the end, the love you take is equal to the love you make."--The Beatles
Happy Valentine's Day!

February 8, 2024

C'est le Weekend!

Looks like we'll be cozying up inside this weekend with a blanket of pretty snow on the ground to admire by morning.
I'm sure there will be some popcorn, movies and outdoor fun.  How about you?

Here are some interesting things I've come across online this week:
  • A recipe for Dark and Stormys, something my friend Amy turned us on to. Have you ever had one?  I love me some ginger beer.
  • Hilarious product reviews of Amazon products
  • Celebrating Candlemas
  • Turn a plain cardboard box into this
  • Is parenting your DIY project?  I'd say yes, for me.
Happy weekend friends!

February 6, 2024

New Relases from Scholatic Storybook Treasures

It's February, and time for some new DVDs from Scholastic Storybook Treasures, which are always anticipated in our home.

First up, in honor of Black History Month, is Stories About African American Heritage featuring MARCH ON! ($24.95)
This 3 DVD set contains 13 stories, both fiction and non-fiction celebrating African-American history, culture, and heroes.  Stories include Why Mosquitos Buzz in People's Ears, Martin's Big Words, and Ella Fitzgerald: The Tale of a Vocal Virtuosa, and of course, the title story.  It's a fun and moving way to teach children about African-American history and heritage.

Another title which celebrates heritage and culture is Stone Soup and Other Stories from the Asian Tradition ($14.95).
I've long admired the Stone Soup story, and have liked sharing it with my sons.  I'm pleased that The Stonecutter is included here too, which is another favorite.  I value its lesson of being satisfied with what skills and place you are given in life, and hope its message conveys itself to my kids.  The story Lon Po Po is also in the collection, which I didn't know prior to this set but which is similar to the Red Riding Hood story.

Another title being released on February 12, 2024 is The Red Hen and More Cooking Stories ($14.95) which is a delight for someone like me who enjoys being in the kitchen and hopes to pass that love along to my sons.
Narrated by Lily Tomlin (she's great as Ms. Frizzle in Scholastic's Magic School Bus series!) and Michael McKean, this collection of 4 stories includes Arnie the Doughnut, Bread Comes to Life, How Do Dinosaurs Eat Their Food? and The Red Hen.

Soren and I have read The Little Red Hen many times, but enjoyed this more colorful, whimsical version more than the dated Little Golden Book we have, especially that the amazing Ed Emberley is the illustrator and his daughter Rebecca is the author.  Its didactic tale of hard work and its payoff (and the bonus of teaching kids how cake--or bread, in the original story--is made) is of interest to me.  Bonus is that the set includes an easy-fo-follow recipe for "Splendid Cake"!

While we haven't heard of the other 3 stories, that doesn't matter.  They're still enjoyable and have encouraged me to hunt them down at our local library.  And as usual with Storybook Treasures, one can read along on the screen as the tale is narrated and animated.  Hopefully you'll pick up a few of your own Scholastic Storybook Treasures and support your child's reading interest.
Disclosure: I received copies of these DVD sets from Scholastic for review purposes.  All opinions are my own.

Jabbertalker and the Pursuit of the Pencil

Robot. Juice.  Home.  Cere-yall.  Get Down. Ocho.  Hatch-oooo! Pop-porn. Poop-eye.  Scoo-Bus.

Jude the Jabbertalker is quite fond of the above words, or really, all words.
My expectations were low for having a second-born who is as good, if not a better  talker than his older brother (also an early chatterer) was at this age.

At nineteen months, Jude is a dynamo of words, and even a few short phrases.  Don't. Be. Fraid. (from a Yo Gabba Gabba song) is one that Chris and I find quite endearing.
Key-cat (kitty cat).  T-Shirt.  Shorts.  Dollars (repeated from a silly robot bank that Soren has, which recites the amount of money inside it at the press of a button).  There is no word that this child won't repeat, well maybe "Grandpa", which always shortens to "Pa". It makes me laugh, thinking of my dad as Pa Ingalls.  He's more the antithesis.

Jude is fond of so many other things, ones that I'll deem as creative, like music and writing.  Yes, I'm sure I'm just searching for and anticipating that one of my boys will pursue the creative arts, however I do think Jude is more inviting of them than Soren was at this age.  Of all the arts, I'd imagine Soren would take more to acting and performing than one of the more introverted arts.
I've never seen a toddler to enamored of pens and writing instruments.  He screams and demands when he sees a pencil or paper.  "Write! Write!" he shrieks when his brother is engaged in some sort of drawing activity.  The photo below is from my Instagram feed.
He's at his happiest when I'm singing and when given paper and a pencil.  And that pleases me as much as it does him.  Let's hope it continues throughout his life.  He can call me up anytime for a song.

February 4, 2024

Follow the Leader

Despite my desire to cultivate creativity in our home, I find I often come up short.  Sure, I have lots of fodder for fun stuff thanks to Pinterest, but that site often makes my mind spin in place like tires on black ice.  It's overwhelming.

With Soren, some of my trouble is that I've been burned so many times when setting up activities for him.  Laying out paper, paints, and other materials I think he'd enjoy often resulted in 20 minutes of preparation and 2 minutes of activity.   And usually that activity involved a huge mess of glue and paper bits.

Notice I say "MY trouble", as it's certainly my issue, wanting to impose my idea of creativity on him.  You'd think my training as an art teacher would have helped, but sometimes I think it hinders things a bit.  In theory, I wholeheartedly endorse the exploration of art materials and process over a cutesy end product.  However, I still enjoy coming up with activities that have a little more structure or some new material to try out, or maybe something related to an upcoming holiday.
Oddly enough, there is play and creativity happening under my nose, and often I just don't pause to encourage or admire it.
Dishes "need" to be done, messes tidied, etc.  But leave it to Chris to remind me of what's important--taking time to follow your child's lead.

Yesterday when packing up for a trip to see the grandparents, Soren insisted on wanting to make a volcano with glue, paper, a stapler, paint and twine.  I was utterly confused by what he was asking, and snapped at him to just get his shoes on, that we were leaving soon.  Thankfully Chris took the time to listen to his request, and helped him create what he envisioned, all while holding Jude.
While I was busy tending to the truly unimportant things, Chris was giving Soren what he needed most--his attention and encouragement.
Sometimes I feel like my son is slipping away from me, mostly from maturity and finding value in friends and others and not just me.  I also see him gravitating more towards his daddy, which makes me happy, especially that both boys always have clung to me more than him.
The boys love when Chris "feeds" them ice. 
I see a builder in Soren, from Legos to laying out towns with cars and blocks to his enjoyment of collage (an acute observation from Chris).  It's fascinating to see who he's becoming and what his interests are, and how little of a role I seem to play in their development.  Children clearly aren't a blank slate, looking to be filled with their parents' experiences.

His view of the world is intriguing, so much so that I've given him my old point-and-shoot camera (the phone has now taken its place--thanks for the idea Erin).  While many of the photos are blurry, some of them are quite interesting.
I know it's unintentional, but these are almost painterly.
Day by day, new lessons are presented before me, mostly ones about letting go of my imposed control and order, but when I do surrender, I'm pleasantly surprised at the results. I say it over and over in my life--children are my best teachers.

I hope your week brings some valuable insight from your littlest guides.  Follow those leads!

February 1, 2024

Crust and Crumb

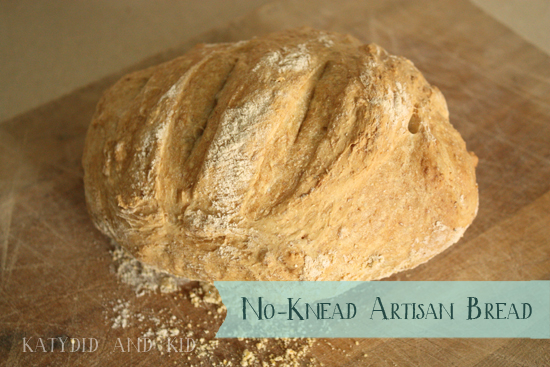
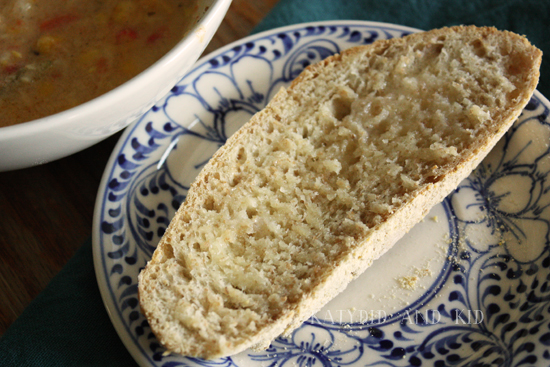
This year, I wanted to learn to make good artisan bread, the kind with a crunchy crust and a chewy crumb.  The kind one usually pays upwards of $7 for.  The kind one usually can't find in a small town like mine.
I jumped on the no-knead, 5 minute bread bandwagon (yes, this wagon has boule-shaped wheels) last year and bought a copy of this book.  It sat on my shelf, waiting to be used.  It took so long because I was being cheap about sinking so much dough into a baking stone and pizza paddle.  Thankfully, my brother gifted it to me for Christmas, giving me no more excuses for digging into the bread baking process.
I've baked at least a dozen loaves last month and I'm pleasantly impressed with the results of this method.  It requires no kneading, no proofing yeast, no mess and very little work.  While it's not the very best bread I've ever had, it's a huge improvement over what comes out of the bread machine or what I can purchase at the grocery store.  And it makes the house smell delicious.

I'm going to share how make the Master Recipe, though I highly recommend buying the book, which contains so many more versions of the recipe, including how to make pastries, flatbreads, pizzas, bagels and other things.

No-Knead Artisan Bread  

(from Artisan Bread in Five Minutes a Day)
Ingredients
6 1/2 cups of all purpose flour (I use 1 cup of whole wheat and 5 1/2 cups all-purpose)
3 cups lukewarm water (just slightly higher than body temp)
1 tbsp salt (the book calls for 1 1/2 tbsp but I found it too salty)
1 1/2 tbsp yeast
cornmeal for dusting the paddle
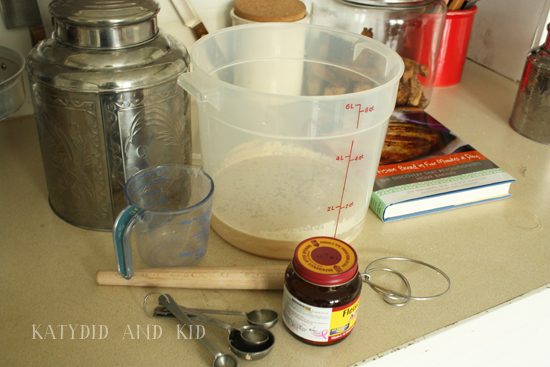
Tools
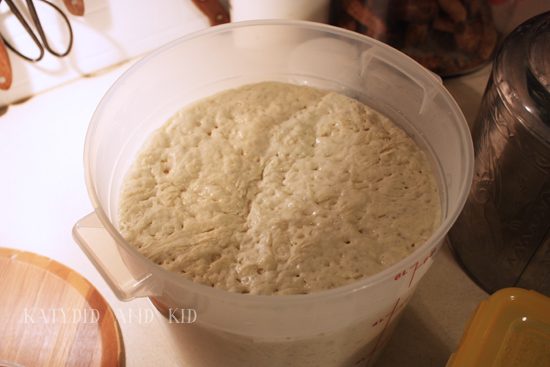
Large container (I use a 6 quart lidded food-grade bucket)
Mixing spoon or dough whisk  
Measuring spoons and measuring cup
Pizza paddle
baking stone (or a cast iron dutch oven or high-heat proof pot)
shallow pan for adding water to the oven for steam

STEP ONE

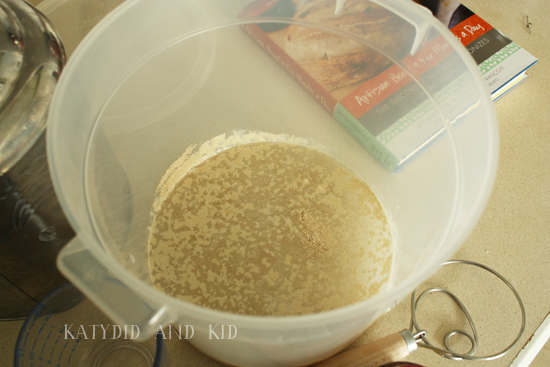
In a large container, pour the water and salt and swish around to combine.   Sprinkle the yeast on top and allow to rest for 5 minutes.
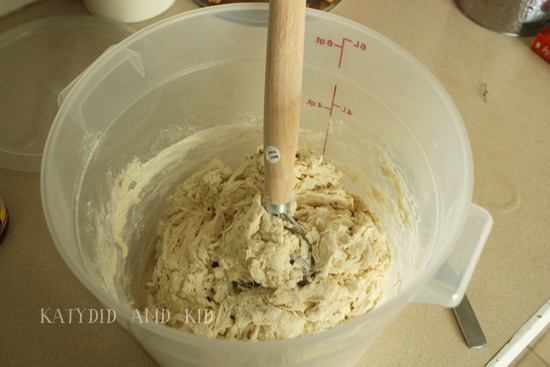
Next, measure and add the flour and mix until combined using the dough whisk or a large spoon.  Don't worry about getting a smooth dough.  Just make sure there aren't any dry spots.

STEP TWO

Cover with a damp cloth or loosely put on the lid (don't seal it).  Set aside and allow to rise for 3-4 hours at the least.  It should be doubled in size.

STEP THREE

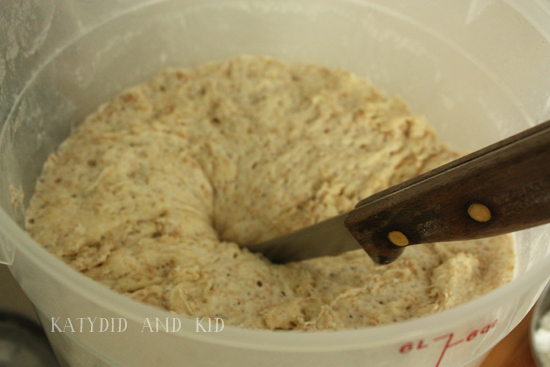
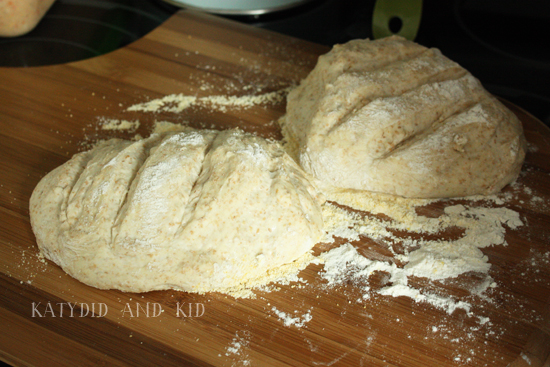
At this point, you can shape and bake the dough, or else stick it in the fridge to store for future use.  To bake, cut off a grapefruit-sized ball with a knife,
then dust with flour.
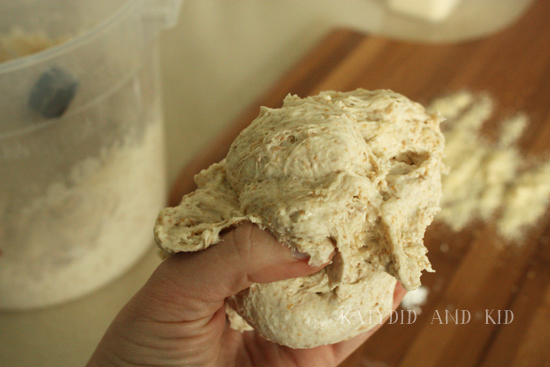
This next part is a little hard to describe (the book does a great job, with photos, which is hard for me to do while forming the dough), but you will make the dough into a ball by slightly stretching it over itself and tucking the ends underneath.  The bottom will have a pinched look but the top should be smooth like a ball.  This process should only take 30 seconds to a minute.

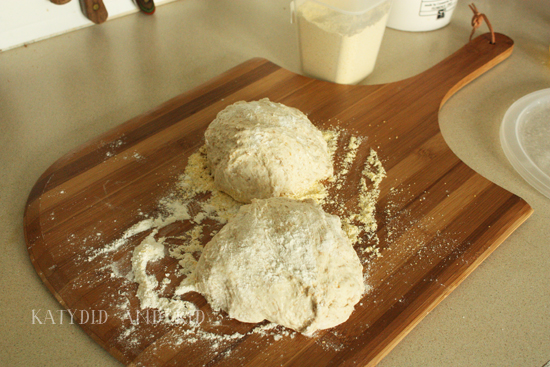
Sprinkle cornmeal on your pizza paddle, then sit the round ball on top.  I made two loaves for today, hence the two balls below.  It doesn't look like much, but it will make up for its looks in taste.
This is the part where people start getting anxious, knowing fresh bread is only about an hour away.
An alternative to the pizza paddle and baking stone is to bake this in a dutch oven.  I haven't tried it yet, but if you do an online search for "no-knead bread in a dutch oven" you'll find more specific info.

STEP FOUR

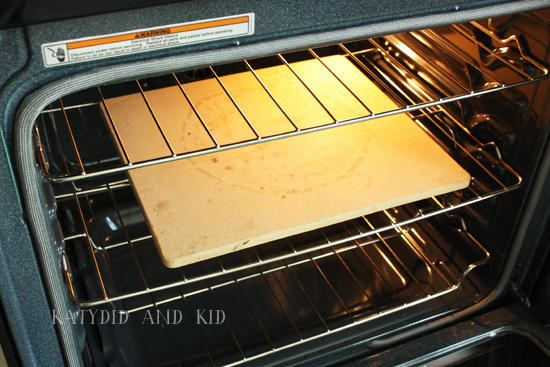
Allow to rise for at least another 45 minutes.   About 20 minutes before you want to bake the bread, sit the baking stone on a rack in the center of your oven, put the shallow pan on a lower shelf, and preheat your oven for baking to 450 degrees F.  Set aside one cup of water for the steam portion of the baking.
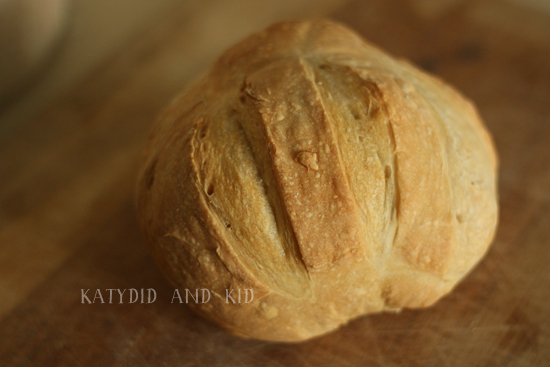
When the oven has come to temperature, slice the top of the loaf either in an "x" pattern or with a few long slits to allow steam to escape.
The loaf might not rise much, but will do so more in the oven.  If you're using dough from the refrigerator (like when you put the rest of the dough away for another day), you might barely see any rise at all, but don't fret. It will still come out tasty, though maybe not as large.

Slide the loaves into the oven.  The cornmeal should allow them to slide off the paddle.
Then pour the cup of water into the lower pan, and quickly shut the oven to trap the steam.  I'll admit, I've omitted this part sometimes, and the bread still comes out good.

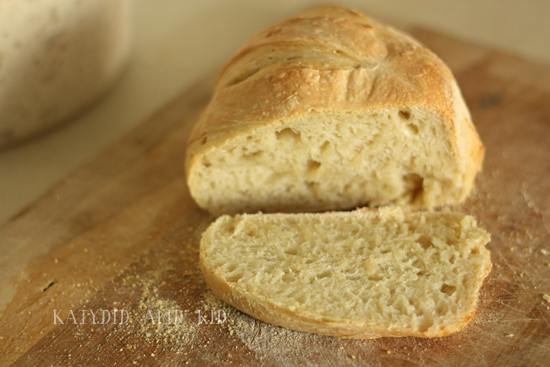
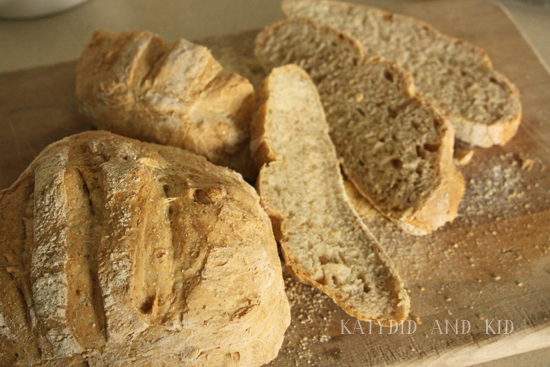
Allow to bake for 30 minutes, until browned.  When done, the loaves should have a hollow sound if tapped on the bottom.  Sometimes they "sing" when they come out of the oven, as the room temperature air hits them.

Cool before cutting, if you can resist. Usually I can't.
You'll get better slices if you can be patient.  Since this bread has a high water content, sometimes the crust isn't so crisp after a day or so, but you can always pop it in the oven a bit to crunch it up.  Good luck having a loaf that lasts more than a meal though.
The best part of this recipe is that you just pop the dough in the fridge once it's risen the first time, then just pull off a chunk to use for dinner.  You do need to set aside about an hour and 10 minutes before you want to eat it (to shape it, then let it rise for 40 minutes, then bake for 30 minutes), but it's so easy.  And the more let the dough sit and the more you add to the dough bucket (I don't rinse mine out), the better it tastes.  It takes on a sourdough quality.

I'm eager to try more of the recipes in the book, like the cinnamon buns.  I definitely recommend picking up a copy for yourself.  Happy baking!
Related Posts with Thumbnails