


 First off, thank you for all of your questions last week for Tech Tuesday. It's really been helpful finding out what interests you or what bugs you about blog technology. Based on the response, I know that most of you are itching to find out how to do a 3 column template in Blogger, and I promise that it's coming very soon, probably next Tuesday. Given the 3-day weekend here in the US, I was just too busy being lazy to sit down and hash out that post.
So today we're talking forms, particularly Google Spreadsheets, since I'm familiar with those already. Just click on my "PR/Review Form" button under my header and you'll see what I'm talkin' 'bout.
Let's say you do product reviews, like me, or have your own business or shop that you'd like to link to your blog. If you'd like customers or PR contacts to be able to submit information in a pre-made form rather than a rambling email that lacks the information that you require, a spreadsheet form will work great for you. {thanks to Naomi for first introducing this to me}. I've been meaning to add a BlogHer sponsorship form here, but would you believe I haven't had time or energy to do it?
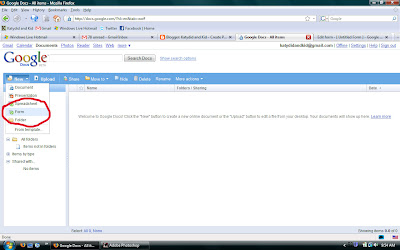
Back to the form tutorial: first you'll need a Google account, and if you're on Blogger or Gmail, you most likely will already have one. Log into your account and go to the Google Docs link.
Create a New Document under the drop down menu on the left, and select "Form" (circled in red). If you click on my screenshots, they'll enlarge so you can see them more clearly.
 Then you just follow the instructions on the page. As you can see below, there's a place to give it a title (on this sheet, it says "Untitled Form") and below the title is a box to write a description of your form.
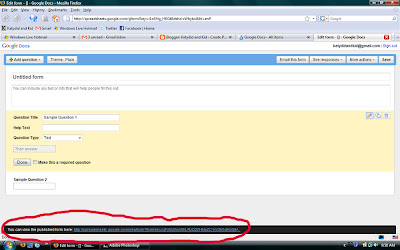 That is where you write a little about yourself, what you like to review, why you're so fabulous, etc.
Below the description is the area for questions. On my form I have items like contact info, description of the company/review item, and other pertinent information. You can make it as long and descriptive or as short and sweet as you'd like.
Once you've completed the document, save it. You'll see a link at the bottom of the page (circled in Red above). This is the link that you'll put on your blog, like on my blog with my "PR/Review Form" button. I linked the image to this URL address, which will immediately take anyone who clicks it to that form.
Whenever someone fills out the form, I get an email that says the document has been modified. The email has a link in it to open your spreadsheet so you can read the modification, ie. the answers to the questions.
To set up an email alert to let you know when someone fills out the form, go into your saved form and click on the Tools dropdown menu. Select "Notification Rules", which has a red X next to it below.
Follow the instructions for adding your email address and the frequency of updates. Save the file and go off on your merry way to add the link (circled at the bottom of that other screen shot above, remember?) to you blog.


8 comments:
Once again you ROCK!! Thank you so much. I didn't even know this was available but I now have one.
Perfect explanation!
I created a form over the weekend actually and was trying to put it w/in a page but it wasn't working. Glad you posted about this...I'll follow your lead and just link to the form.
Thank you so much for explaining this! I just started a new blog on Financial stuff for nannies and I would like my polls to be a bit more detailed..so this will work perfectly!
As always, sooooo helpful! :)
Thank you - this is very helpful!
I want to be in your head :D
Kisses
Thanks mucho
Wow- it is so generous of you to share your knowledge on a subject like this! Thank you! I just followed your step by step tutorial and it worked perfectly!
Thanks girlfriend!
Shannon at:http://milkandcuddles.blogspot.com/
Post a Comment