November 30, 2023

Wishbone Book Tutorial

Remember that craft challenge I'm in (So You Think You're Crafty?). Well, I made it through week 4, the turkey theme, with my Wishbone Book. Whew! So here's the instructions if you'd like to make your own.

Rather than create a straightforward turkey design for last week's theme, I decided to take inspiration from one of our family's turkey day traditions--the wishbone.
This part of the turkey was anticipated by my brothers and I every Thanksgiving. As kids, we would fight over who got to break the wishbone, and the possibility that our wish (for candy or toys, usually) would come true.

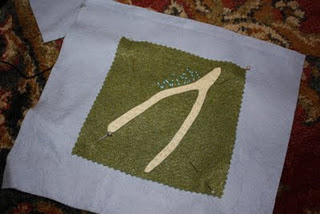
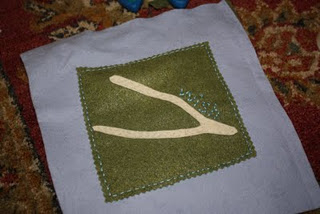
Using the coptic stitch, I bound this book together and sewed on a felt cover complete with a wishbone and the simple word "wish."
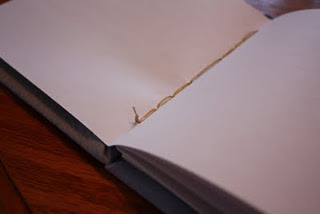
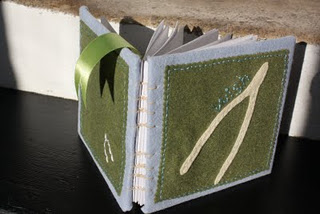
When you open the book, the pages lay flat, making it ideal for sketching. This would be a perfect place to write and remember your wishes and dreams.
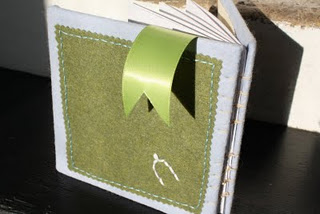
Materials:
~Felt (at least 3 colors--I used white for the wishbone, blue and green for the background)
~Coordinating colors of DMC Embroidery floss
~Scissors
~Book board or heavy cardboard
~Awl or hammer and nail~Tacky glue
~Linen cord
~Blunt needle
~Copy paper (25-50 sheets, depending on how thick you want your book)~Paper cutter


1. Decide on the size you'd like your book to be. I made mine 7" square, but it might be easy to make your book 9"x6" so that you can simply fold your copy paper in half for the pages, rather than having to cut it on a paper cutter.

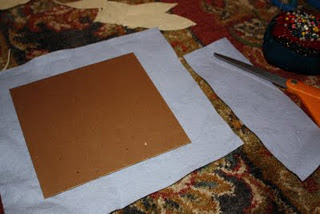
2. Cut your book board/cardboard to size, making it slightly larger than the paper that will be inside. In my case, the cover was 7"x7" and the pages were 6 1/2" square.
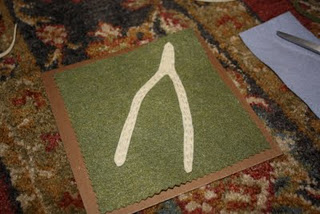
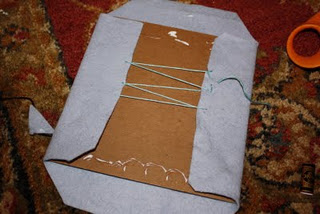
3. With the color felt that you'd like predominantly on the cover (in my case, green), cut a square (or rectangle) one inch smaller than the cover board. I cut mine with pinking shears for a zig zag edge. Onto this piece, you'll stitch a wishbone shape, which I cut out of white felt.

4. I also embroidered the word "wish" along the edge of the wishbone, then pinned the green panel to a blue felt background...
and stitched the entire panel to a the blue felt. This entire piece will wrap around the front cover. I made sure the blue felt was at least 4" larger than the cover board so it can wrap around the sides.
5. Lay the embroidered felt piece face down. Spread glue on one side of the book board and lay it on top of the blue felt, making sure it's centered as best as you can.
6. Fold the corners in, glue them down, then fold the sides in and glue them too.

Thread some yarn/floss and tie a knot on the end, then sew the sides together to hold them in place.
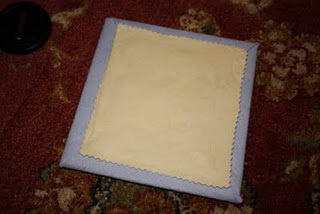
7. Do the same thing on the other two sides, then cover it with a square of white felt, which is large enough to cover the edges.
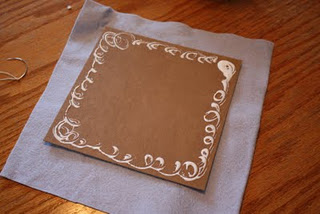
8. Make another cover for the back, omitting the green panel sewn onto the blue felt. I embroidered a little wish bone on my back cover before gluing it down.

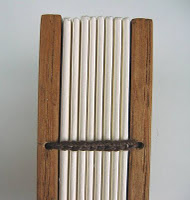
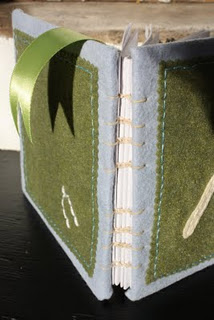
9. Once both covers are finished, you'll prep your paper for the inside. My book was 7" square, and my pages were 6 1/2", so I needed to cut 50 sheets of paper 6 1/2" x 13" on the paper cutter. Then I divided the paper into 5 stacks of 10 sheets, which created 5 signatures of paper that will be sewn together. A signature is fancy talk for a folded section of pages that are sewn together to create a book. I wanted my book to be 100 pages, so I needed 50 pages, folded in half and bundled into 5 signatures. You can see an example below of the folds of the signatures sewn together along the binding.
10. You'll need to make a paper template for punching the sewing holes through your paper and cover. Measure 8 evenly space holes about 1" in from each end and

11. It's time to move onto the sewing! You'll need about 30" of waxed linen thread with a large knot on one end and threaded through a blunt needle.

Of course as I usually cram to finish the book for the challenge (sounds a lot like college), I neglect to take photos of myself sewing the coptic stitch, so I'm directing you to another site for that. I've sewn these books by the dozen and could probably do it with my eyes closed, but frankly, I'm tired and scatterbrained.

I did however take a few photos of the cover being prepped. I punched the holes for sewing along the edges of the covers, about 1/2" in from the edge.
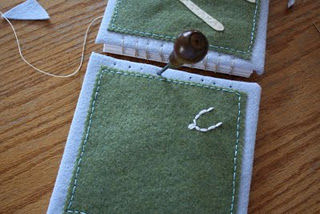
Here's the back cover being punched and ready to be sewn to the rest of the book. One starts by sewing the first signature to the front cover, then adding signatures and ending with the back cover.
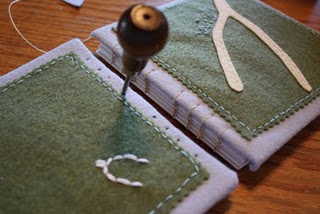
Then you knot the cord on the inside of the book and you're done.
I'm really going to try and get some photos of myself doing the coptic stitch, but it's just been so hectic around here, plus working on the next project. I apologize for a half-@*5-ed tutorial, yet again.
It does make a really nice journal/sketchbook, since you can open it 360 degrees. And it's cushy and fuzzy too!

November 27, 2023

Welcome to Katydidandkid.com!

I did it! I made the jump from katydidandkid.blogspot.com to katydidandkid.com!

So far, no major problems other than my blogroll links disappearing and a reader having trouble leaving a comment. Those of you who don't update your blogroll will still be directed to the .com site. I'm going to see if my feed still works without having to go into FeedBurner to mess with it. One thing at a time...

Oh, and speaking of one thing at a time, I decided to do a blog makeover last night. I'd been working on the graphics over the last few weeks, and was just too eager to wait on the blog makeover I won from Design Girl. Truthfully, I hope she'll just clean things up a bit and jazz up the sidebars. I'm sick of the center post format. I'll post my process this week on Tech Tuesday.

And if you're looking for a last minute holiday gift to yourself, maybe you'd like a custom button or banner for your blog, designed by me. Just sayin'.

November 25, 2023

Yummiest, Simplest Cranberry Sauce

Though I won't be cooking a feast tomorrow, (we're mooching from my parents), I contribute my highly-complemented, often-requested cranberry sauce each year, which I found in an issue of Everyday Food a few years back.
I just made it this afternoon, and ended up doubling the recipe, since we're expecting around 25 people. It's so tasty and is equally good with turkey dinner and over hot cereal.
Cranberry Grape Compote
~1 bag fresh cranberries, rinsed
~3 cups seedless red grapes, rinsed
~1 cup sugar (I used a bit less)
~1/8 tsp. salt

Combine all ingredients in a saucepan. Simmer on medium until cranberries pop. Let cool and transfer to a jar or serving dish. Makes a little over 1 quart.

Enjoy, and Happy Thanksgiving!

What Would You Do?

I keep going back and forth in my mind about whether or not to put up a Christmas tree this year. We buy a real one, and had a gorgeous one last year, but I'm dreading keeping my toddler from destroying it. I'm not too concerned about the ornaments, since I'll just put the more fragile ones higher on the tree, but I'm worried that he'll be pulling off lights and such.

Of course I know my toddler best, but I was wondering how any of you moms and dads have dealt with trees and toddlers in the past, either real or artificial ones. We put one up last year when SoJo was crawling, and he was pulling at the branches then, so I have no idea what will happen this year. Thoughts?

November 24, 2023

Katydid's Favorite Things of the Season

With Christmas quickly approaching, I've been thinking about the holiday traditions that I loved doing as a child and ones that I'd like to continue or add with SoJo. As part of Twitter Moms, I'm sharing 5 of my favorite holiday activities to do with my child. Now that my son is a toddler, I think it will be a little more exciting this Christmas for us all.

A few things we want to try this year:

1. Visiting a local park that is decorated with lights for the holidays. They really do a nice job, and it's free. On certain weekends, they have live Christmas music too. There's a concession stand that sells hot cocoa, and one building has a model train set up.

2. Baking cookies, of course! And eating them too.
Snack mix from last year
3. Making salt dough ornaments together for the grandparents.

4. Teaching him the words to Christmas carols. He loves repeating nursery rhymes and songs, so I'm sure he'll enjoy this.

5. Shopping for a toy together to donate to Toys For Tots. I always want to incorporate some kind of charitable act(s) during the Christmas Season.

What are your favorite things to do with your little ones?

Disclosure: As a result of participating in this, I may receive a gift card from Twitter Moms.

November 23, 2023

Poor Girl's Cardboard Chandelier Tutorial

This was my entry for the "Green" theme of the So You Think You're Crafty challenge. Not the So You Think You're Crazy one.
I love the juxtaposition between what we think of as garbage and what we think of as fine art. Since I try to go green whenever I can, I thought it would be interesting and beautiful to create a chandelier using cardboard--something which would normally be cast away after use.
Wouldn't this be cute in a kids' playroom or clubhouse? And yes, you can actually burn candles in it (adults only, of course). Though I'd recommend those LED tea lights.
There's no cardboard above the flames, and the candles sit on baby food jar lids, so it's not that risky.
Materials:
~Scrap Cardboard
~Cardboard mailing tube (at least 3" diameter)
~Hot glue gun/ glue sticks
~16 gauge wire
~Pliers/wire cutters
~Jute
~blunt/tapestry needle
~Scissors and/or utility knife
~Hammer/nail
~Handsaw
~jar or cup to use as a template for the candle holders
~metal lids from juice cans or baby food jars.


1. First, measure your cardboard tube to be 12" long, then draw a line around it and cut it with a handsaw. You may need to sand the edge if it's too rough.
2. At one inch down from the end, make 6 evenly spaced holes in the tube. I drew them with a pencil, then used a hammer and nail to poke the holes, but you could also use an awl.
At the other end of the tube, poke 3 evenly-spaced apart holes about 1 1/2 inches in from the end. These will be used for hanging the chandelier.

3. on to the wire. Cut 6 pieces of wire, each 45" long.
4. Bend the wire into an curved shape like you see on the arms of a chandelier. Once you make the first one, use that as a guide for the others. You'll then push one end of the wire into one of the 6 holes at the bottom of the tube, then thread it up through the inside of the tube, folding it over by an inch or so over the top.5. When you have all 6 arms threaded and secured inside, it's time to move on to the candle holders. Take a jar (I used a baby food jar) or cup and wrap the wire around it in a spiral shape.
Then pull the spiral a bit on the bottom, forming a cup-like holder for the metal juice lids or baby food jar lids to sit on.
6. Now it's time to cover the wire. Cut 12 strips of cardboard, roughly 30" long by 1 1/2" wide. They should be long enough to cover the wire arms of the chandelier.

7. With the cardboard strips, you'll sandwich the wire between them, using hot glue to hold it together. I seem to have lost my photos for these steps, or else forgotten to take some due to my tendency to become consumed by craft projects. You can see it below somewhat.
8. Once you cover the main arms, cut 12 more strips, 1 1/2" wide by 12" long. These will make embellishments in between the arms (as shown above) and under them. Taking one strip, tightly curl it around a pencil, forming a curl. Then hot glue one end to the tube in between each arm.
See the curl underneath the arm above? You'll glue another curled piece of cardboard there on each arm too, making it super-fancy.

9. Next, make a scalloped detail for each candleholder. Cut a piece of cardboard long enough to go around the holder, and wide enough to hide the wire spiral. Cut scallops on one end,
and hot glue it to the wire around the candle holder area.
10. Now on to the "crystals". You'll need to draw either a freehand circle of about 1" diameter or find something to trace onto a piece of stiff paper. Then cut it out and use it as a template to trace and cut out roughly 140 (!) cardboard circles for the drapes of crystals.
It sounds like a lot, but it really didn't take me that long to do (maybe 30 minutes).

11. When these are cut out, string them together using the jute and the tapestry needle. Cut about a 24" length of jute, leaving a 6" tail for tying on both ends. The needle easily slides through the airy part of the cardboard, between the two sides.
You'll be making 12 lengths of beads, using 12 beads per strand.

12. Tie the strands onto the chandelier. I tied them all at the top to the wires bent over the tube, then let half of the strands drape down, tying them to the bottom of the wire on the candle holder. The other 6 I tied to the top of the candle holder, onto the wire.
13. To make it even more chandelier-like, I added more crystal-like embellishments under each candle holder. I folded a piece of 2"x4" paper in half, and drew half of a droplet shape along the fold. Then I cut it out and traced 6 of them on cardboard.
Then I strung it and one single round bead onto jute and tied it to the bottom of the wire from the candle holder.
Oops, this one is missing the round bead. I did add it later. I'm so bad at taking photos for tutorials!

14. To finish, I added 6 more 1.5" by 12" curls along the top of the tube, two 1.5" wide bands around the middle to hide the ends of the cardboard strips, and a few extra beads I had. All of these I hot glued to the tube.
15. I slipped the metal lids onto each wire holder, adjusting them to pinch the lids in place. I then added 3 pieces of jute for hanging, knotted them together, and hung it up. Be sure to remove any hot glue threads, unless the cobweb look is what you're going for.
Truly a chandelier worthy of a Paper Bag Princess. Now if I could only convince my mother to let me hang it above her table at Thanksgiving.

So You Think You're Crafty: Week 3/Turkey

It's Monday again, and time to send you over to vote on yet another week of So You Think You're Crafty. This week's theme is turkey, for obvious reasons, but I love the creative angle that the crafters took on the theme this week.
Here was mine from last week. Yep, I was the crazy person who combined cardboard and flames to make a Poor Girl's Cardboard Chandelier.
I like making stuff out of unusual materials, so this was right up my alley. It's currently in our attic, awaiting a home in either the upstairs play space in our work-in-progress or some other funky locale.
And yes, I'll most likely be putting battery tea-lights on it--the flames were for display purposes only, lol. Tutorial to come.

FYI: We crafters get the week off this week due to Thanksgiving, so our next project won't be up until 2 weeks from today. We definitely could use a little break this week.

Vote Now!

November 19, 2023

Katydid's Favorite: Carolyn's Kitchen {Giveaway}

My apron fixation has been discussed on this blog many times, from my Mom Mom's apron to the aprons I made for my niece and cousin's daughter last Christmas. There's just something transformative about an apron, whether it's putting one's mind in work mode or in sex kitten mode.

Sex kitten? Well of course! After all this is a Carolyn's Kitchen giveaway.
Carolyn's aprons were featured on The Girls Next Door, that show about Hugh Hef's Playmate girlfriends.

Bake your cookies in this and there will be more heat in your kitchen than an oven can provide.
I own 2 of Carolyn's aprons, including a sweet little holiday number that is fun to wear while baking cookies. It gets lots of complements, so an apron from Carolyn's Kitchen would be a most welcome gift for any lady, whether she cooks or doesn't.

Carolyn is kindly giving away
A Yellow Dorothy Apron!
To enter:
Visit Carolyn's Kitchen and leave a comment here with your favorite apron in her shop.
Extra Entries (leave a separate comment for each one):
  • Blog about this contest (2 entries--leave 2 comments)
  • Subscribe to my updates
  • Follow my blog via Google Friend Connect
  • Post my Favorite Things button on your blog
  • Follow @CarolynsKitchen and @katydidandkid on Twitter and tweet this giveaway, leaving a link to your tweet in the comments. You can tweet once per day (leave a comment each day). You can copy and paste my tweet if you'd like: Win a cute and flirty Dorothy apron from @CarolynsKitchen for your holiday baking http://bit.ly/25cp61 @katydidandkid Ends 11/29
US Postal addresses only.
You must do the first entry in order to enter ("I want to win, thanks!" comments will NOT be considered). You will have until Sunday November 29th at 11:59pm EST to enter. The winners will be chosen via random number generator the next day and notified by email. I'll also post the winners on my blog HERE. If I don't hear back from the winner within 72 hours, I'll pick another.
Disclosure: I was not compensated for this review/giveaway. It's just one of my favorite things that I wanted to share with y'all.

November 17, 2023

Felt Leaf Crown Tutorial

Here's the tutorial for my entry in last week's So You Think You're Crafty challenge. Though in my mind, it's a pretty simple project, it does require basic sewing skills.

Leaves are things of beauty, whether or not they're real or made of wool felt. To celebrate the cool autumn nights and the falling of the leaves, I created a felt leaf crown, named for Ceres, the goddess of the harvest.
What little (or big) girl wouldn't love wearing this at the Thanksgiving table?
Mostly embroidered and stitched by hand, this crown will make its wearer feel like the queen of the harvest amidst the fading days of fall.
Materials:
~Wool felt (or acrylic--I promise not to look down on you!) of various colors
~Embroidery needle
~Straight pins
~Scissors and pinking shears
~Sewing machine (optional)
~Elastic band
~Leaf tracers or leaf-shaped cookie cutters
~Coordinating buttons for decoration
~DMC Embroidery Thread. I used some gold thread and also some colors from my late grandma's vintage stash

1. To begin, I measured my head to figure out how big I wanted the crown. I subtracted a few inches for the back, where there would be an elastic band to make the crown stretchy.

2. With my measurements, I sketched out a template on a piece of paper (newsprint) with the basic background shape of the crown (sorry no photo here!). I wanted to make the crown highest in the center, and then go lower on the sides. To make it even on both sides, I folded the paper in half, and drew the shapes I wanted. You can roughly see it on the back of the crown in this photo:
3. Using various leaf cookie cutters and different colors of felt, I cut out leaves. I first traced each leaf template onto a piece of paper and cut it out.
4. Then I pinned it to the color of felt I wanted to cut.
and cut it out.
5. Then I pinned the leaves into place on the crown. You could do this individually, but I found it easier to work when all the leaves were in place and centered.
I also placed my buttons on it in the photo, just to see how they'd look. I'll add them at the end.

6. I used the backstitch to sew each leaf to the crown. The backstitch (great tutorial at that link) produces a solid line rather than a dashed one like the running stitch. When sewing on the leaves, I "drew" with the thread, making it look like the veins of leaves.
7. So it's easier to see, I'm going to show you how to do the backstitch on a felt leaf, but not one that is pinned to the crown. Just imagine that you'll be doing this directly onto the crown.

You'll start by threading your needle and tying a knot on the end. Push the needle into the back of your fabric about 1/8" away from where you want your line to begin. Then pull it through to the front.
Bring the needle down 1/8" to the place where you want your line to begin.On the back side, you'll push your needle through, coming out a little farther up on your line.
Then you go back through the hole where you previously made a stitch. Just keep doing this until you're done with your line, then tie it off. This is the time consuming part of the crown--all those stitches! But it's relaxing to do while listening to TV or music.
8. When all of those leaves are done, you'll sew on the buttons. I also added some extra embroidery around the edges, like scrolls.
Here's the back, not the best part of the work, but that will get covered up with another piece of felt.
9. I cut out a coordinating color of felt for the liner (in my case, red). Just lay the front of the crown over the new felt, pin it, and cut the felt slightly larger than the edges.

10. Hand-sew the lining felt to the crown. I added a zigzag edge with pinking shears along the bottom. I also made sure it showed from underneath.
The lining felt also keeps your forehead from becoming irritated by the knots of your embroidery.

11. Leave the ends unsewn together so you can tuck the elastic inside. The elastic will make the crown fit snugly on your head. I love this vintage brown elastic, another treasure from grandma's stash.
Cut a short length (I think mine was 3") and pin it to the sides of the crown. I sewed the elastic on with my sewing machine, but you can do it by hand.
On the machine, I sewed a rectangle around the edges of the elastic, then did an "X" in the center to secure it.Once both ends of the elastic were in place, I hand-stitched the sides of the crown/lining together.
And that was it! I apologize for being lax about taking true step-by-step photos, but I'm not a fan of flash photography and due to the constraints of being mother to a toddler, I was only able to work on this at night. So I reluctantly snapped shots of this project. Just so you know.

Go forth and make crowns!
Related Posts with Thumbnails