


 Kitchen Table Crafts is back, baby! This tutorial is for a festive banner, perfect for birthday and other special occasions. This one is for my son's first birthday next week, but you can really make these for any occasion.
Today I'm sharing with you a tutorial on making one of those cute banners that you see frequently on Etsy and other blogs. This was really easy to make, albeit a little time consuming with all the cutting, pasting and tying. I like that it can be saved and reused every year, so it was worth all of the trouble.
 Materials:
~Scrapbook papers in coordinating colors (at least half as many sheets as you have letters)
~Cardstock or stiff paper
~Scissors
~Glue stick or adhesive tape (acid free is best if you want to keep this for a few years)
~A few rolls of ribbon
~Hole Punch
~Pencil
~Computer/printer
Process:
1. If you're looking for some great, FREE fonts, go to the Scraptivity website (a great online scrapbooking resource) and go to the section for Fonts and find a font that you like. I used "Circus" but unfortunately, that one is not on that site. You can get it HERE, which isn't where I got it, but it should work just fine.
2. Download your font, and save it to your desktop.
3. Move the file (.ttf) into the font folder of your control panel. This will ensure that the font appears in Word.
4. Open Microsoft Word, type the phrase (in capital letters if using Circus, since lowercase ones don't show up) that you want to put on your banner, such as "Happy Birthday", "Happy First Day of School", "Happy Halloween", etc. Then select it and change the size until the letters are big enough for you.
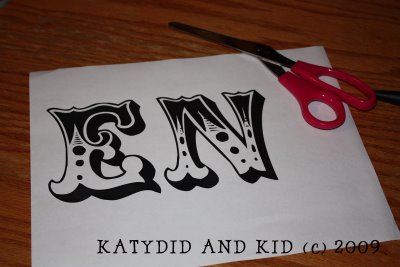 I was able to fit 2 letters per page on the "landscape" setting (horizontal paper). I believe my font size was 350.
5. Cut out your letters and set aside.
6. Now you'll be cutting the background circles from your scrapbook papers. You should be able to get 2 circles per sheet, plus 4 triangles from the leftover corners that can be used to make a little banner.
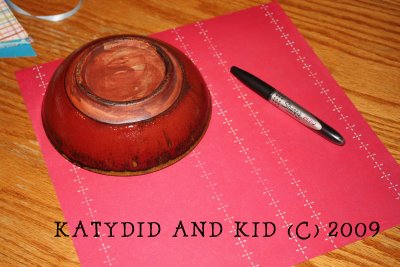 I used a bowl to trace the circles on the paper, then cut them out, saving the scraps for later.
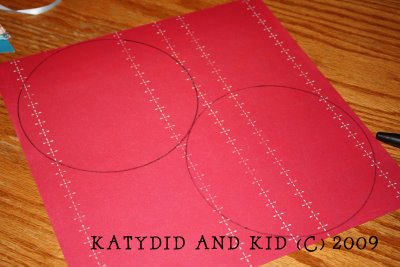
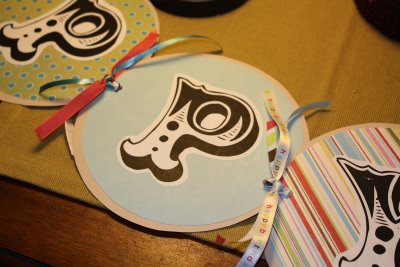
7. Glue your letter to the circle, using a glue stick or adhesive strips. Elmer's glue is too wet and will create bubbles in the paper.
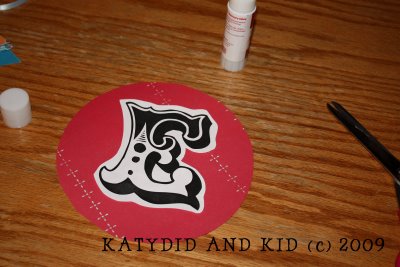 I also cut out some extra circles to serve as "spacers" between the letters, so it wouldn't read "happybirthday".
8. Since scrapbooking paper is so thin, I wanted to stiffen it up so it wouldn't sag when I hung the banner. I had some cardstock (you can get it at an office supply store--it's just a little stiffer than copy paper), that I decided to paste onto the back. I took another high tech circle maker, in this case the lid to a jar
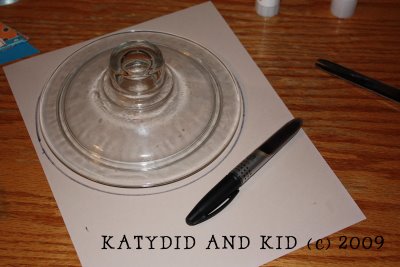 and traced another, slightly larger circle. You can make it the same size as the decorative circle, but I wanted a bit of a border around my circles. Just cut it out, then glue it to the backs of the scrapbook paper circles.
9. Once you've assembled all of your circles, it's time to punch holes in the sides to tie them together. I started with one and eyeballed the center of the circle, making sure the letter was lined up how I wanted. After I made the first one, I used it as a template to punch the holes in the other circles.
10. On to the ribbon! A high chair tray serves as a wonderful ribbon corral, that is, when a certain little boy is not sitting in it.
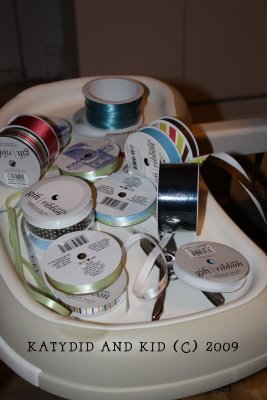 It's easier to cut all your ribbon at once, rather than doing it as you go along. But do you think I did that? Of course not!
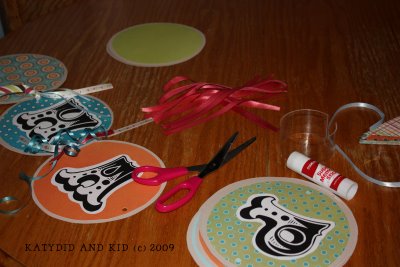 I used 3 pieces of different colored ribbon per loop. I like how that it looks more festive and fuller that way. The pieces were roughly 8 inches, and some of them I trimmed shorter after they were tied. Be careful not to knot them too tightly or you might rip the paper.
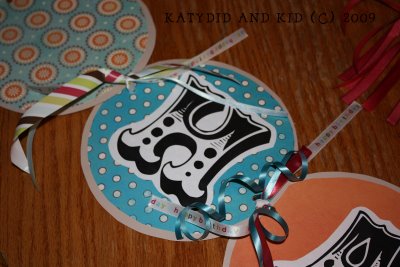 I found some really sweet coordinating ribbons, including one that said Happy Birthday. They were only $1 at AC Moore. Once you've tied them all together, you're done! Just add some ties on the ends to hang it up.
11. Before I show you the final result, I want to jump back to those leftover scraps. As I mentioned, you can get at least 4 triangles out of them to make some mini banners.
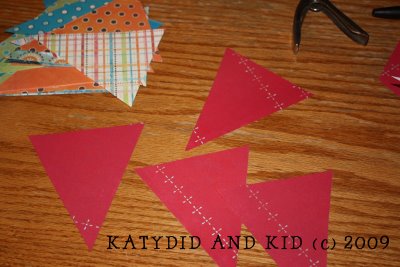 Just punch two holes on the top, and thread a ribbon through. They would be great party accents, and would carry the color theme throughout your home.
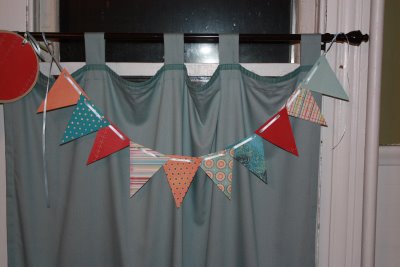
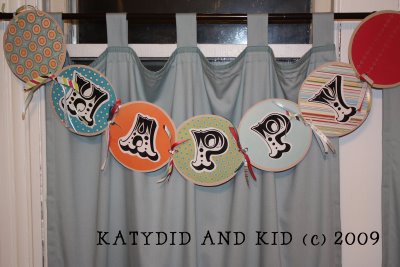
Here it is! I decided to break up the words into a few separate banners, rather than just having one really long banner. You can do whatever you'd like.
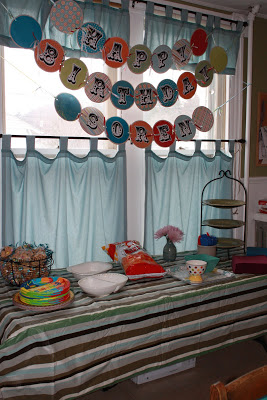 Update: the completed banner hanging at the party.
Enjoy! And Happy First Day of Spring! You need a banner for that now, don't you?


Love it! You're so crafty!!
ReplyDeleteAnother awesome tutorial...keep them coming!! :) :)
ReplyDeleteThat is gorgeous! When is SoJo's big day?
ReplyDeleteThat's really cute. Thanks for sharing.
ReplyDeleteWow! That looks great! I am not at all crafty but I may try my hand at something like this…. Thanks for the great tutorial. Happy Birthday to your little one.
ReplyDeleteThat looks awesome! Nice to meet you - Happy UBP!
ReplyDeleteWe love making things and crafting. So glad to have found you via UBP09! :)
ReplyDeleteGreat idea!!!! I have some tacky, not cute at all banners that I bought, when I could be making these fantastic ones. You are so clever. I'm going to go subscribe for more ideas....
ReplyDeleteThank you to the blog party for leading me over here!!
Thanks for the tutorial! I'm going to try and make that for my son's first birthday! ("try" being the operative word of course!)
ReplyDeletecool craft i new to UBP i got so many new blogs got about 300 now i go to :)
ReplyDeleteAbsolutely fabulous tutorial. I'll be linking to this later tonight on my party planning blog.
ReplyDeleteHappy ubp09 :) It was great meeting you
That looks much easier than the fabric ones, since I can sew! But just as cute! :)
ReplyDeleteWhat a great tutorial! Thanks for sharing!!!
ReplyDeleteReally great tutorial, although I still don't think I will tackle this one!
ReplyDeleteHi, stopping by from the party...thanks for the great banner tuturial...loved it!
ReplyDeletethanks for the great idea I have several birthdays coming up soon
ReplyDeleteI found your blog throught the blog party!! Love the banner.. I have made several and I love using them.. I love that I found your blog and will be reading it regularly!! Thanks!!
ReplyDelete~Rachel
I just got the carnival font and LOVE it! Thanks for sharing where to find it!
ReplyDeleteOh wow I love your banner. I'll have to remember that when my Lily's birthday comes around.
ReplyDeleteThanks
Stopping by from the blog party link!
ReplyDeleteI loooove this idea! Thanks for sharing! Its too cute!
Hey, those are great ideas! I cannot wait to start some table crafts with my daughter.
ReplyDeleteGreat site!
Fun craft! Thanks for sharing it for the party! :)
ReplyDeleteI'm c&ping this for my to do list. I must get more creative!
ReplyDeleteThanks girl.
It's nice to meet you! I'm here from the UBP and look forward to getting to know you more this week.
ReplyDeleteNell
I love the way you give us step by step procedures. Found you through the UBP.
ReplyDeleteHi! It's just me. Party hopping around. I am participating too so stop on in for a visit.
ReplyDeleteI need to contract one from you. I am not crafty nor do I like working with paper, yet I love the banners~!
ReplyDeleteThanks for the comment on my blog. I love the banner. There are so many crafts floating around in my head but not enough hours in the day!
ReplyDeleteHi Kathleen-
ReplyDeleteYou and your blog are adorable.
Coming by from The Ultimate Blog Party to say hi. Make certain to check out my place for your chance to win a LeapFrog Tag Reading System. :)
Stacie
The Divine Miss Mommy
http://www.thedivinemissmommy.com
http://www.twitter.com/stacieinatlanta
That is such a cool idea! Thanks for sharing it with all the blog party goers. I'll definitely have to add your blog to my RSS feed so I can keep up with your other stuff!
ReplyDeleteStop on by when you get a chance. I'd love to see you at my party!
April
http://naturalelegance.wordpress.com
Thanks for sharing. Very nice banners!!!
ReplyDeleteHi there, coming over as a blog hopper taking part in UBP. It is very nice to meet you and your blog. I have a blog at www.superfunmama.blogspot.com. It is a blog about the learning and fun activities I do with my tot. Very nice to meet you!
ReplyDeleteThat turned out great - I really like the look of the circles!
ReplyDeleteFantastic tutorial - thank you so much for sharing it!!
ReplyDeleteLove your blog, I've added you to my blogroll. :)
Thank you for this tutorial! I always wondered what to do with the fonts after you downloaded them.
ReplyDeleteHello! Poppin’ in from The Ultimate Blog Party…all the way from Queensland, Australia! G’Day! I hope you have time to visit my party soon.
Ta!
I want to invite you to the Mommie Daze Virtual Baby Shower that I am hosting May 15 to June 8. This is an international even and there are prizes! Stop by my blog for all the details.
What a fun craft idea! I am great a copying other people but I am not the most imaginative on my own. I'll have to give this one a try. My son is having a birthday Thursday so it's just in time!
ReplyDeleteThat is so cool. I never even thought about making a banner like that.
ReplyDeleteThat is so cool! Happy UBP! :D
ReplyDeleteGreat tutorial!
ReplyDeleteStopping by from UBP to says "hi" - party on :-)
carma
Hi,
ReplyDeleteJust wanted to let you know I like your tutorial and have linked to it on my blog, The Handmade Experiment. Check it out - http://emilyflippinmaruna.wordpress.com/2009/05/04/must-have-monday-tutorials-and-handmade-items-to-make-your-el-cinco-de-mayo-a-hit/
Thanks!
Emily
Love this!! Thank you so much the tutorial was very detailed. I followed your instructions and made a banner for my sister-in-law's baby shower.
ReplyDelete-Mandy
Love it! Especially since I have two b-day parties coming up....AND I noticed you and I have the same scrapbook paper :)
ReplyDeleteThank you for a great tutorial. I loved how it was using basic things around the house. It looks SO cute and I better make one soon!
ReplyDeleteSoren is one lucky dude. 1) He had an awesome birthday banner. 2) He has an awesome mama that made his birthday banner. 3) He has a rockin' cool name.
ReplyDeleteThanks for taking the time to post this. It's exactly what I need. I'm going to make one just like it for my twins' first birthday coming up in a few weeks. I particularly love the font you used (and printing out the letters instead of tracing them). I'm going to put pics of them in the empty spaces. And, thanks for the suggestions of using the leftover triangles. I would have never thought of that!
Hey just found your site and thanks for the tutorial, I'm actually gonna make one for my son's first birthday :) I am following you now.
ReplyDeleteJust made this banner per your tutorial and it turned out beautiful. Can you tell me what you used as the ties on the end? Is that just ribbon or did you use something stronger?
ReplyDeleteThanks!
I just used ribbon, though I had to keep tying more on because I made the initial piece too short. You could add a sturdier twine and then disguise it with more ribbon.
ReplyDeletehey there, i finally posted the picture of the banner! check it out when you have time. http://www.everymomhasherday.com
ReplyDeleteThanks *so* much for this tutorial! I am a brand new papercrafter and this was a fantastic project. Even my 1 year old noticed and loved her banner :)
ReplyDeleteYay--thank you so much for the explicit directions about downloading the font!!! I'm so excited about the banner I'm doing for my grandson's first birthday :)
ReplyDeleteThank you so much for this information, I just made my husband the greatest birthday banner, thanks to you!!
ReplyDeleteWhat an awesome tutorial! I have to thank you. I found this pinned through pinterest a couple weeks ago and I made one for my son's 1st birthday. I mentioned your link in my blog post today.
ReplyDeleteThanks again!
Heidi
http://hi-dho.blogpspot.com
Thanks so much for this tutorial! I used it today to make a banner for a church youth activity and I was really pleased with how it turned out. I even used the same font as you! Thanks, I found you on Pinterest.
ReplyDeleteWow, impressive!!! I'm actually going to attempt to try & do this, so thank you;))
ReplyDeleteIs there another site or a new link for the fonts because when I clicked on scraptivity it didn't work!
ReplyDeleteThanks a lot - great tut. Really enjoyed it.
ReplyDeleteSure! Thanks!
Delete