Showing posts with label Handmade Holiday. Show all posts

December 11, 2023

Give the Gift of Essential Oils {Giveaway}

As much as I like the smells of the holidays (baking, evergreen, citrus) I prefer natural scents to perfume-y candles and air fresheners.  I use eco-friendly cleaners in my home, so I am drawn to products made from all-natural ingredients.

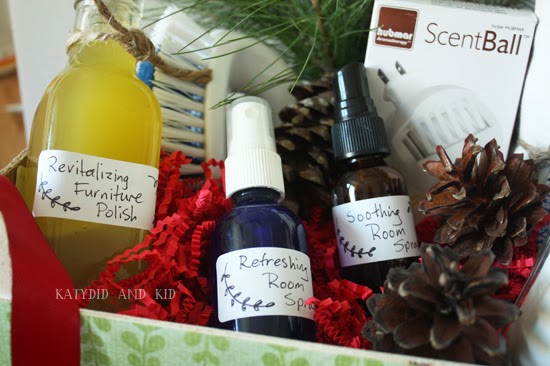
I keep an assortment of essential oils on hand to use in everything from personal skin care to massage to cleaning.  When Puritan's Pride, an online provider of supplements, vitamins, natural beauty products, healthy snacks and more, contacted me about trying out some of their essential oil products, I thought it would be the perfect opportunity to create some all-natural, handmade gifts for the holidays.
Aromatherapy is a way to manage stress during this often-stressful season, so I was delighted to try their aromatherapy products.  I was sent a bottle of their Wonder Oil (an amazing citrus-y fusion of oils, herbs and fruits for the body, including Olive, Sunflower Seed, Wheat Germ, Sweet Almond, Sesame and Jojoba Oils, a ScentBall plug-in aromatherapy diffuser, and three 100% essential oils in lavender, peppermint, and eucalyptus.
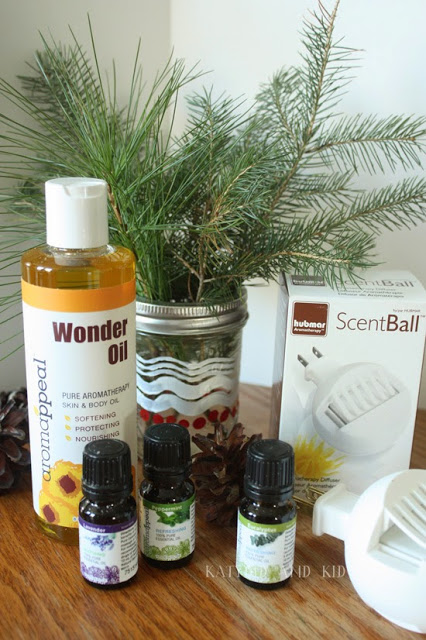
Puritan's Pride began over 40 years ago, with the mission of making the finest quality nutritional supplements available at the best value to their customers. Today, the company remains true to its original commitment and serves millions of loyal customers. Puritan’s Pride manufactures thousands of  vitamins, minerals, herbs and other nutritional supplements in their state-of-the art facilities located throughout the U.S. As part of the company’s commitment to quality, Puritan’s Pride only uses ingredients from suppliers worldwide that meet their Quality Assurance Standards, as well as Good Manufacturing Practices food quality standards.
I love all three of these scents, and thought that used alone or combined could make a wonderful gift set for a teacher, friend, or neighbor.
Packaged in a decorated clementine box, this gift basket is both inexpensive and easy to make, and is a handmade, thoughtful gesture.

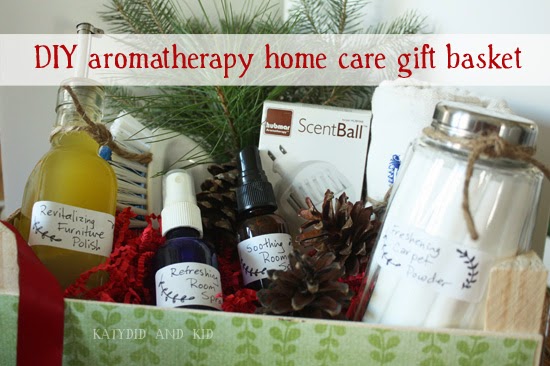
You just need a few plain or fancy jars to put the items in, as well as a spray bottle for the room spray.  Here are the recipes I created.

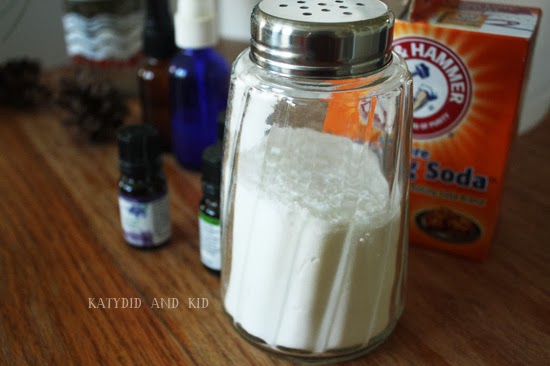
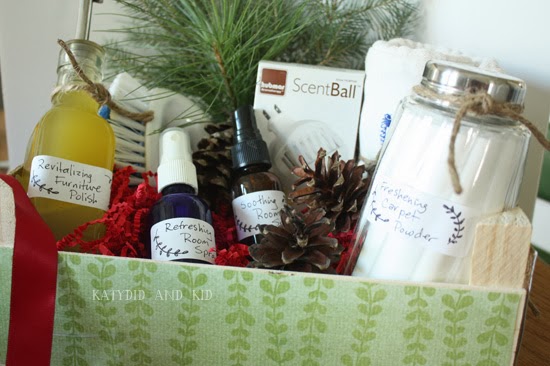
FRESHENING CARPET POWDER
  • baking soda
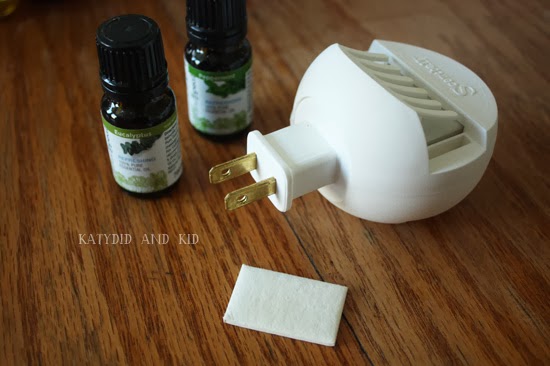
  • 100% essential oils (I used peppermint, eucalyptus and tea tree oil, which I had on hand)
  • Parmesan cheese jar, or just save the cap from a plastic Parmesan container and screw it onto a mason jar (it works!)
Fill your jar halfway with baking soda, then add 5 drops of each essential oil to the jar.  Cover the top and shake well.
Fill the rest of the way with baking soda and shake again to combine.  Add a pretty label, as well as an instruction one on the back that says something like "sprinkle on your carpet, wait 5 minutes, and vacuum as usual."

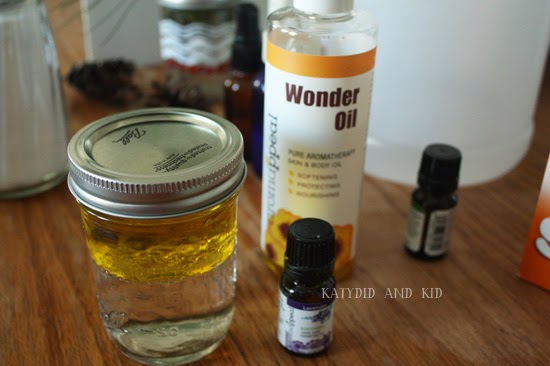
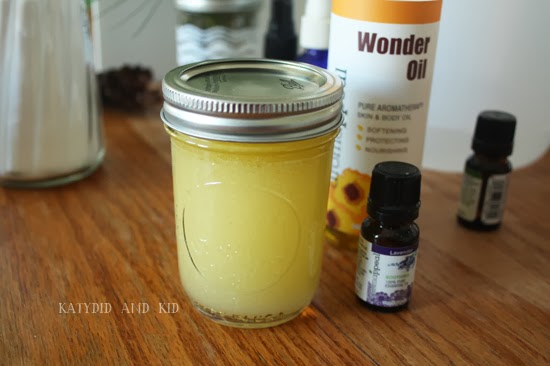
REVITALIZING FURNITURE OIL
  • 1/4 cup Wonder Oil (a blend of olive oil and other great-smelling essential oils) or plain Olive oil
  • 1/4 cup white vinegar
  • 5 drops of eucalyptus oil
Combine all ingredients in a glass jar.
Cover and shake well.  
Add a pretty label as well as instructions to "Shake well.  Pour one tablespoon onto a clean, soft cloth and wipe onto wood.  Buff with a dry cloth. Repeat process monthly."

SOOTHING ROOM SPRAY AND REFRESHING ROOM SPRAY
  • Distilled water
  • Lavender essential oil for soothing spray and peppermint and eucalyptus for refreshing spray
Add enough distilled water to fill your spray bottle halfway.  Add 8 drops of essential oil into the water, then top with more distilled water.  Shake well and include instructions for user to shake well before use.
The addition of a diffuser into this gift basket is a really nice touch.  The ScentBall diffuser plugs into the wall and comes with reusable pads that you add 5 drops of essential oil onto.
It plugs into an outlet and gently warms the pad, releasing a subtle, pleasant scent.  I have mine in our bathroom, where it works to mask unappealing odors without the chemical cloud that typical air fresheners use.

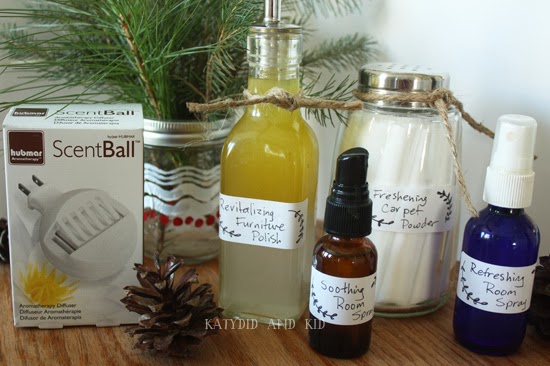
I packaged all these home care items in a clementine box that I had decoupaged with scrapbooking paper, and added a scrub brush and a cloth diaper (for cleaning, they make the best reusable rags).
Tuck in a few evergreen branches, some pine cones and tie on a pretty ribbon, and you have a lovely seasonal gift that will make the recipient's home smell fresh and clean.
Puritan's Pride has so many other delightful essential oils to choose from, as well as other products to create a holistically healthy lifestyle.

You can learn more about Puritan's Pride via the Puritan's Pride Facebook page as well on Twitter @PuritansPride.

One lucky reader will win an assortment of aromatherapy products from Puritan's Pride.  Please enter via the Rafflecopter widget below.
a Rafflecopter giveaway

Disclosure: I received sample products from Puritan's Pride for review purposes.  All opinions are my own.

November 29, 2023

Handmade Gift Idea: Hex Sign Cork Coasters

Our wooden end tables have been taking some abuse from the many cups of hot tea and coffee I've been consuming in the last month.  I might perch my hot cup on a magazine, but sometimes I'm guilty of just setting it on the table.

A friend gave me some crocheted coasters, which I've used at times, but they always seem to be tossed like frisbees around the living room by my boys.  I think one of them is still under our sofa.

I thought maybe some less-inviting ones might be worth a shot.  I saw these swakny glass ones at Target the other day, but of course glass+boys=second thoughts.
I saw some nearly identical ones in the dollar store the other day, but plastic with cork centers.  They begged to be decorated, and at one dollar for four and weighing about 5 lbs less, I thought they were worth a try.  I'm pleased at how they turned out.
Living in a Pennsylvania Dutch town, I'm inspired by the arts and crafts and designs that make up this region's heritage.
So I had a little fun creating my own versions of hex signs.
I have a book on Pennsylvania Dutch designs that proved helpful, but you can search online for hex sign designs and find plenty of options.

It was a very inexpensive project, considering I only had to buy the coasters since I had the rest on hand.  Here's what I used:
  • Cork coasters 
  • Acrylic paints or a paint marker
  • brushes
  • pencil
  • Mod Podge (for sealing the paint onto the coaster)
First off, I found a simple design that I liked and used that as a starting point.  I wanted to copy a hex sign I have on my wall, but change the colors.
Then I lightly sketched it onto the coaster with a pencil.  I apologize for not snapping photos of the craft in progress, though I think you can fill in the blanks with your imagination.

Next, I painted the design.  You could make it all one color, like white, or use a lot. I went with primary colors and white, and I made sure that some of the cork was visible underneath. I like the contrast of the natural brown color and the brighter hues.

Once the paint dried, I added a thin layer of Mod Podge to protect the paint.
They're not perfectly painted (I was lazy and didn't meticulously measure my designs), but I like the handmade look.
So far they haven't been whipped across the room, but if/when they are, I'm not worried about them shattering into pieces or clunking someone on the head.

I definitely see more sets of these in my future; they would make great Christmas gifts.  If you're not so artistically inclined, you could always use or make a stencil to add a monogram to the coaster. 

November 20, 2023

The Annual Bake, Craft and Sew Along

I'm participating again this year in the Bake, Craft and Sew Along at According to Kelly
Come check out my Needle Felted Snowflake Tray and how to make it.
But, I get to help start the holiday season off with a bang, and treat you to an absolutely amazing giveaway as part of our crafty series.
A SILHOUETTE PORTRAIT
:: this is Silhouette's newest electronic cutting tool for personal use. Like a home printer, it plugs into your PC or Mac® with a simple USB cable. However, instead of printing it uses a small blade to cut paper, cardstock, vinyl, fabric and more up to 8" wide and 10 feet long. The machine also has the ability to register and cut printed materials.

:: non-toxic and enviromently-friendly, DecoArt has one of the widest selection of paints and finishes for arts, crafts, and home decorating, which includes over 25 brands of paint and finishes.
* * * * *
Be sure to check out all the fabulous craft projects shared this month for this Holiday-Inspired Bake Craft Sewseries going on all month long.  Don't forget head on over to Skip to my Lou and A Southern Fairytale for more chances to win! a Rafflecopter giveaway

November 12, 2023

Make a Holiday Bulb-Forcing Jar with Martha Stewart Paints

With Christmas quickly approaching, I've been thinking of some easy and pretty gifts to make for teachers, friends and family.  When you have a limited budget like I do, I'm often searching for crafts that not only look elegant, but are cheap to make.

I love giving the gift of living things, specifically plants.  Poinsettias, Christmas cactus, Amaryllis, and Paperwhites make festive and uplifting presents.  I decided to pick up some paperwhite bulbs at a local garden store to turn into gifts.  Their smell is so intoxicating when in bloom, and they can be used over and over, if you take care of them properly once they finish blooming.

Rather than just put the bulb in a nondescript container, I recycled some glass jars into containers and embellished them with Martha Stewart Paints.
Given my love of Scandinavian design, and especially the Christmas traditions and decorations from that region, I was inspired to create items that incorporated the traditional red and white colors of a Scandinavian Christmas.
To create this project, I chose my supplies from a plethora of paints, etching cream, glitter, brushes, daubers and stencils from Martha Stewart Paints that I was sent.  I was eager to turn these supplies into something pretty.
I'm sure I'll be creating lots of "something pretties" for weeks--yay for a reason to craft, Christmas.

With such an assortment of products, I wasn't sure where to begin.  I knew I'd definitely want to use the glass paints, but probably not the glitter.  I stuck with the paint brushes, a few adhesive stencils (they work great on rounded objects) and the daubers.
Here's my supply list:
Martha Stewart glass paint in red and white * Martha Stewart frosted glass paint in white *Martha Stewart stencils * Martha Stewart glass painting brushes, patterning brush set and daubers * Martha Stewart adhesive holiday stencils * clean glass jars (Mason jars work well) * Narcissus bulbs * red rick rack trim * glass stones for inside the jars

STEP ONE
If choosing to use an adhesive stencil, apply it to your glass item, making sure to adhere it well to the glass so paint can't get underneath.
Prepare your paint by squeezing some onto a plate, then pouncing a stencil brush on it.  You don't want goopy paint in your brush, just enough to tap onto the stencil.
Once the paint is dry (it doesn't take long), you can peel of the stencil and use it somewhere else if you'd like.  I put 4 snowflakes on my glass jar.

STEP TWO
I wanted to do more free-form painting on my glass, so I chose to use the glass painting brushes and daubers.
I love love love the pattern brushes, the one that looks like a toothbrush above.  It allows you to make equally-spaced lines, as well as checkerboards, plaids and other designs.
Now if only they'd make a "shaky hand eliminator" tool.

I spent some time embellishing the jars with the brushes as well as adding plenty of dots using red and white paint.
They came out really festive looking and simple in their designs.  Simple is better most of the time, in my book.

STEP THREE
When the paint was dry, I tied some red rick rack to the tops of the jars, just to add a different texture to the craft.   Alternately, you could use ribbon or just skip this all together.
Then I put some glass pebbles in the bottom of the jars, which I bought at the dollar store (read: cheap).
I plopped a bulb in each one, and added enough water to just cover the stones.  You don't want your bulb submerged in water or it will rot.  But do make sure to check that the water hasn't dried up in a day or so.  Refill if necessary.
The bulbs themselves should take a few weeks to grow in a sunny window, so now's the time to start forcing them indoors in these jars.

Now you're all ready to display them in your house for the holidays or give them as gifts.
They will perk up any windowsill!
You can use the paints for so many other things too.  I made a coordinating vase out of a salsa jar that was headed for the recycling bin.
Imagine the possibilities, especially on trash day.  This is a project that would be fun to do with children too, especially for grandparent or teacher gifts.

Many other craft bloggers have created their own projects using Martha Stewart Paints.  You can visit their tutorials via the links below or by following the hashtag #MarthaHolidayPaint on Twitter.
You can find more inspiration and information about Martha Stewart Paints via the Plaid Facebook page,  @PlaidCrafts, and on Pinterest.
Disclosure: I wrote this post as part of a paid campaign with Plaid/Martha Stewart Paints and The Blueprint Social.  All opinions are my own.

December 6, 2023

Homemade Peppermint Bark

Sometimes I'm stumped as to what to make or give people during the holidays, especially casual acquaintances like neighbors and co-workers.  Rather than toiling away in the kitchen, getting flour all over while making cookies, I decided to go the quicker route--making homemade peppermint bark.
Yes, I know Williams-Sonoma has the best, but at $26 a lb. that's way out of my price range for the mail carrier.  This recipe is a good knock-off, and much cheaper to boot.  Plus you can get all the items in your local grocery store, or even Target.

Here's what you'll need, and note--buy the best quality ingredients that you can afford or find: 
  • 24 oz. milk chocolate chips 
  • 36 oz. white chocolate chips
  • Peppermint oil or extract
  • 2 boxes of candy canes
  • aluminum foil
  • cooking spray
  • large baking pan (mine was 12"x18")
  • Double boiler (or a 2 bowls that can fit over a pot of simmering water)
Ready your assembly area by lining your baking pan with aluminum foil, making sure that it covers the sides too.  Spritz with cooking spray.
Unwrap your candy canes, and place them in a heavy-duty ziplock bag, then crush with a rolling pin.  Little helpers love this part!
 
Place your double boiler or pot of water on the stove to simmer.
Put the bowl on top, and add the milk chocolate chips.
Stir until melted,
then pour into your prepared pan, and spread to the edges with the back of a spoon.
In another bowl, add the white chocolate chips.  I wish I had been able to find better quality ones, especially where cocoa butter is a main ingredient, but this is all I came up with.  It still tasted good in the end.
Put these over the simmering water, and stir until melted and smooth.  Remove from heat, add half of the smashed candy canes and 1 1/2 tsp. of the peppermint oil or extract.  Stir well, then pour on top of the milk chocolate, which should be a little firm.
Carefully spread with the back of the spoon to cover the sides of the pan.  While it's still warm, sprinkle the rest of the candy cane bits on top.
And then the torturous waiting begins.  He sooooo wants those candy canes, the little peppermint addict.
I stuck the pan in the freezer to firm up before cutting.  Just be sure if you end up freezing it that you bring it back to room temperature before cutting, or you just might break a finger or cut yourself.

When firm, lift the foil and peppermint bark out of the pan, and find a chef's knife to go to work with cutting.
You're really kind of scoring then breaking it into large pieces.
 It's so easy and so delicious, and will impress anyone who gets some, especially when packaged in a cute little tin.
Just be sure to save some for yourself!
Related Posts with Thumbnails