June 30, 2023

gone fishin' {kids' art tutorial}

It's summer, and time for another art workshop at our local library. I enjoy giving my time and art teaching skills to the library, and I love seeing what the kids come up with.
Since the theme this summer at the library is water, I decided to do a fishing game activity with the kids. You know, the kind you might see at a carnival where kids get a fishing pole with a magnet and try to catch plastic fish in a pond. I know I loved doing that at our local amusement park when I was little, so I figured other kids would like it. And they did!
It didn't require much in way of art supplies, actually, more of a trip to the hardware store. I picked up some dowel rods for the poles
and screw eyes, magnetic tape, and electrical tape.
a drill (optional) to help you get a hole started in the dowel. Mr. Geek kindly drilled out all the holes for me, and cut the 48" dowels into 16" pieces on the chop saw. The drilled hole also helps prevent the dowel from splitting. Such a good man I married! He'll do what it takes to help the kids out.
Naturally, Oscar our cat is always right in the thick of any activity we're doing.

Then I screwed the eyes into the end of each dowel. It was easier to twist them with pliers, since my hand was getting tired doing around 30 of them.
There you have it! Fishin' rod.
Since the ends are often a bit rough, I wanted to make a "handle" on the ends. I took some colored electrical tape we had around the house.
And wrapped it around the end opposite the hook.
Quite easy, and it makes a comfortable grip for the kiddos. They will attach yarn and a metal washer onto the pole themselves.
At the hardware store, I also picked up some adhesive magnetic tape. This will be stuck to the fish so that the metal washer can pick them up.
To prepare for the class, I cut the tape into roughly 1" pieces.
It's easy for the kids to just peel off the backing and stick it onto their sea creatures after they make them.

On to the fish....
I had a couple of different options for them. They could color and cut out ones that I printed online (search for "fish coloring pages") and photocopied onto heavier cardstock
or trace a cardboard fish that I cut out as a template
Or just draw and cut out their own. It helps to offer a few versions, depending on the age and skill level of the child. I of course prefer when kids draw their own, but it can be intimidating for the younger kids to come up with their own design. We did make sure there were plenty of books on sea life so they had references to look at.

Once the fish has been colored, cut out, decorated (they loved the glitter at the library), just attach the piece of magnet close to the mouth of the fish.
Add sequins, googly eyes, or whatever strikes your child's fancy and fits into your budget. Try not to make the fish too heavy or the magnet won't work well.
I love the blowfish that this sweet little girl made.
Then scatter your fish on the floor and try to catch 'em!
Here's a recap of the materials you'll need:
  • Dowel rod (16-18")
  • string/yarn
  • screw eye hook
  • electrical tape
  • metal washer or nut
  • construction paper, cardstock, or print-outs of fish from online
  • scissors
  • glue
  • markers/crayons
  • magnetic tape
  • glitter or other decorative items like sequins or pom poms

Enjoy and have fun with your little ones!

June 29, 2023

coffee bean direct {giveaway}

I don't indulge in much anymore, other than food and drink (and my waistline hates me for it), but I must admit that my biggest indulgence in the liquid category is coffee. You can't just give me any old coffee and expect me to enjoy it. My husband and I believe in purchasing the best quality that we can afford for our java habit, since we don't splurge on much anymore.
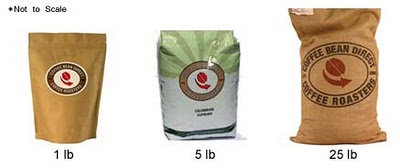
We tend to buy Fair Trade, organic coffee when we can, and when I came across Coffee Bean Direct, I thought that their selection of beans was great. They sell their coffee by the pound, by the 5lb, and even in 25 lb bags.
They also offer sampler packages, in case you'd like to try a few kinds before buying in bulk. Coffee Bean Direct roasts their own coffee beans, which eliminates a middleman and gets gourmet coffee at great prices to your coffee maker.

We tried out the Costa Rican La Amistad Organic which is grown on La Amistad farm, a farm that has been dedicated to organic growing practices for over 10 years.
I must say that it was wonderful! It was smooth, a bit nutty, and not acidic like some other brands we've tried. We got whole bean coffee and ground it ourselves, which makes for a better brew too.
My husband and I have been thoroughly enjoying it with our breakfasts, both iced and hot. It's a great way to wake up to the day.

You can find many more varieties and roasts at Coffee Bean Direct. Which is your favorite?

Coffee Bean Direct is kindly offering 1 K&K reader
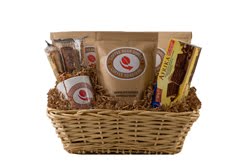
A Small Coffee Lovers Gift Basket
  • Two 1lb Bags of Fresh Ground Coffee
  • A 12oz Package of Chocolate Covered Espresso Beans
  • One Package of Cookies
  • Three Premium Biscotti
  • One Coffee Bean Direct Coffee Mug
To Enter
Visit Coffee Bean Direct and leave a comment here with the type of coffee or tea that most appeals to you.
Extra Entries (leave a separate comment for each one):
  • Sign up for Coffee Bean Direct's e-Newsletter (2 entries--leave 2 comments)
  • Blog about this contest (2 entries--leave 2 comments)
  • Subscribe to my updates
  • If you're a Fan of Katydid and Kid on Facebook leave a comment letting me know
  • If you're a Fan of Coffee Bean Direct on Facebook, leave a comment letting me know
  • Follow my blog via Google Friend Connect
  • Follow @CoffeeDirect on Twitter and leave your Twitter handle in the comment
  • Follow @katydidandkid and tweet this giveaway, leaving a link to your tweet in the comments. You can tweet once per day (leave a comment each day). You can copy and paste my tweet if you'd like: Win a Coffee Lovers' Gift Basket from @CoffeeDirect http://goo.gl/fb/IpcEE @katydidandkid #giveaway
US Postal addresses only.You must do the first entry in order to enter ("I want to win, thanks!" comments will NOT be considered). You will have until Sunday July 11th at 11:59pm EST to enter. The winner will be chosen via random number generator the next day and notified by email. I'll also post the winners on my blog HERE. If I don't hear back from the winner within 72 hours, I'll pick another.
Disclosure: I received a pound of coffee from Coffee Bean Direct for review purposes.

June 28, 2023

my day in the city

My friend Candice of Mom Most Traveled happened to be in New York for the Travel Bloggers Exchange, and since I'm a 2 1/2 hour bus ride to Manhattan, we decided to meet up. I hadn't seen her since last summer at BlogHer, and yeah, she like, lives in Laos. Across the world. You get my point, this was a rare opportunity to hang out with Candice before she jets off somewhere else. Hopefully her ears are up to it.

After initially thinking we'd head to the Museum of Modern Art, one of the few museums opened on Mondays in NY, we decided instead to visit the American Museum of Natural History. I hadn't been there since I was a kid when my dad dragged my mom, my 4 brothers and I up Central Park West to see the dinosaur bones. That man was on a mission.

I didn't feel like lugging my SLR camera around Manhattan, so I'm totally stealing Candice's photos from her blog post. This one was taken in the Hall of the Universe, with a big meteor or something behind us. I guess we were too busy talking to take notes on what we were standing in front of.
It was a hot, humid day in New York, so I was not looking so coiffed (swimming around in my head all day were the lyrics hot town, summer in the city, back of my neck gettin' dirty and gritty). Thankfully, we were underground or inside most of the day. I love that the 81st Street subway stop has an entrance directly into the lower level of the museum, so we didn't even need to go to the street level.

We saw Tyrannasaurus Rex, among lots of other things (again, I'm stealing her photo).
It was nice just to stroll the museum, without an agenda and without having to wrangle kids. We ate a quick lunch in the museum food court, surrounded by other people's kids, then hopped the subway back downtown to catch our bus and train. It was a brief visit, but quite enjoyable. I love how something like a blog can bring people together. Miss you Candice!

I'll be in New York again in August for BlogHer. I'm looking forward to meeting up with some of you all too!

confess

Ok, so who nominated me for this?
Guilty party, fess up! All others, feel free to go over and vote, every day if you are so inclined. Somehow, someone thinks I should be in the category of CEO--Chief Executive Organizer, as in the best organizing blog (psst, thank you! mystery nominator).

June 26, 2023

a night out with paper, scissors and glue dots

Last night a few of the neighborhood moms and I got together for our monthly night out. Usually we play bingo and nosh on snacks that we each bring, but this month I decided to shake things up by bringing an art project.
I chose bookmaking since it seems like an "adult" craft, rather than say, pom pom dolls, and also because most people don't realize that you can actually make books.

With materials leftover from various projects from my teaching days, I assembled the goods for a Coptic-bound book making party. Can a gathering of 4 people really be considered a party? Anyway, I have a tutorial here from last year on how to make this kind of book yourself, though I've linked to another site for the sewing technique.

I also brought along some Glue Dots, which I received as part of a Twitter Moms promotion, which included coming up with some fun ways to use Glue Dots in summer crafting..
Though I'm not a scrapbooker, Glue Dots are apparently really good for scrapbooking--convenient, acid-free, and easy to use. You can check out the Glue Dots Facebook fan page for more ideas and info.

Glue Dots come in a variety of sizes, and for the project I brought along the Dot N Go dispensers in the regular and mini sizes. They also work on materials beyond paper, like fabric, wood, metal, foam, you name it! They're quite sticky, so I imagine they could bond nearly anything.

We used it to assemble the books and to decorate the covers with scrapbooking paper.They're truly mess free, unlike glue sticks and bottled glue. You just roll the dispenser over the paper
making sure to cover the area that you want to stick something to. In this case, I wanted to decorate the inside cover of the book and cover the ribbon shadows that are holding the pages to the cover.
Then stick away!
Glue Dots are great for embellishing too, especially when you just want a touch of glue rather than a glob
It was really simple to add this flower to the cover and not worry about it sliding around waiting for glue to dry.
The mini Glue Dots worked perfectly on that tiny heart.
The hardest part is deciding what to use your book for. We discussed that at length last night, along with childbirth, going back to work, and women on parole (no lie! I confess, I brought that up--long story).

It was a fun night out for all of us moms and it's great to reconnect with our creative sides regularly, beyond the coloring books and construction paper animals, of course. And I'll definitely be using Glue Dots again for various projects, like cards and birthday banners. What are you going to make today?
Disclosure: I received samples of Glue Dots via a Twitter Moms summer crafting promotion with the possibility of winning an Amazon gift card for this post. I would have shared this with you anyway though!

June 24, 2023

peanut butter banana smoothies revisited

I posted about my famous (at least in our household) peanut butter/banana oat smoothies back in January (yeah, I know, winter is the PERFECT time for smoothies). Well, I revisited them again this week for a Collective Bias project involving Hershey's Syrup, and with this hot and heavy weather we're having, it was certainly a welcome treat at the breakfast table today. And so easy to whip up too.
Here's what you need:
2 ripe bananas (frozen ripe ones are even better)
1/2 cup plain yogurt
2 tbsp peanut butter
1/2 cup oats

2 tbsp honey
1 cup milk (more if you want it thinner)

ice cubes
3 tbsp Hershey's Syrup (or more to taste)

Instructions: Break up the banana, add everything to the blender and whirl it around on high until smooth.
Drizzle with more chocolate syrup and enjoy.
They'd be great at a 4th of July picnic, or really any place you need some cooling off.
Disclosure: I wrote this post as part of a Hershey's Syrup promotion with Collective Bias. I received a $25 PayPal deposit to thank me for participating and to pay for any ingredients I may have needed for the recipe.

June 23, 2023

pretty peas

The first of the peas have finally come to our table.
I planted them a bit late, like early April, so it's taken a while to enjoy them on our plates. The purple pod peas and the pretty purple pea flowers on the vines are a bonus in the garden amongst all that green.
They've run out of climbing space, but in my mind the peas were really an experiment. I've never grown them before, and I can't recall my dad growing them in our garden either when I was little. I've definitely learned to make more space around them and to use taller runners, which I'll do next year.
This morning I sat and shelled the peas, enjoying the delicious feel of popping them out of the shells. Something about it reminds me of a zipper.
We should have enough for our dinner tonight to go along with the grilled salmon and brown rice that I'm mentally preparing.
I now understand why some people eat their peas one at a time--all that shelling is a lot of work! Here's to savoring the small things in life, one at a time.

June 16, 2023

The Best Thing in My Purse

I don't go anywhere without this.
Being fair-skinned, both Soren and I must be vigilant about sunscreen. I put on a daily moisturizer and sunscreen every morning. Sometimes though, when I'm out-and-about and forgot to pack a tube, it's great knowing that that Badger Balm's Sunscreen Stick is stashed in my purse. Especially on days when the sun is particularly strong and I need some more protection.

We've been using Badger's sunscreen for a few years now, in fact we just emptied our last tube when we were at Disney World last month. I love its lavender scent, and after recently reading a recent report listing the best and worse sunscreens, I'm happy to see that Badger Balm was in the top of the list.

If you're looking to buy the Sunscreen stick, it's made with zinc oxide and natural ingredients. The cocoa butter smell is wonderful, and the stick is very easy to apply on the face and neck.
Plus because it's primary sun protection is zinc oxide, it works immediately. I don't have to worry about applying the sunscreen a half an hour before we go out. It does make the face look a bit white due to the zinc, though I can't say that we look as severe as Japanese Kabuki actors.
You can get Badger Balm products, including other items in the skincare line, at many health food stores and also on their website.
Disclosure: I received a sample Sunscreen Stick from Badger Balm and have been happily buying their products for years.
Related Posts with Thumbnails