Showing posts with label Giveaways. Show all posts

August 6, 2023

Bloody Mary Bowtie Salad {+Giveaway}

O humble tomato, how I adore thee.  This time of year is especially ripe (ha!) with possibilities for incorporating fresh tomatoes into my cooking.  But who wants to eat anything hot?  Not me.
Last summer, I participated in the Summer Pastabilities recipe contest sponsored by Hodgson Mill, where my Southwestern Pasta Salad won second prize.  This summer, I'm participating again, since I'm always up for a creative challenge in the kitchen.

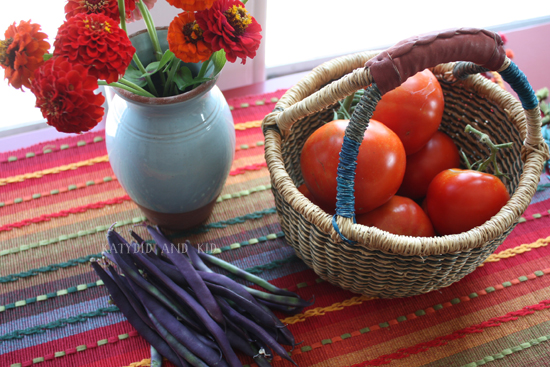
When I was pondering ideas for pasta salad, of course I had to look to the tomato.  I always chop them for pasta salads, but the typical Caprese pasta salad was sounding a little tired from the recipe index in my brain.  Basil?  Mozzarella? Time for something different.

When flipping through a cooking magazine, I came across a recipe for a Bloody Mary, that tomato-y drink spiked with vodka, often served at (or for!) brunch.  The spicy, tangy drink could certainly translate to pasta salad, hence, this recipe was born.
A gruesome name for a really tasty pasta salad.  Here's how you make it:

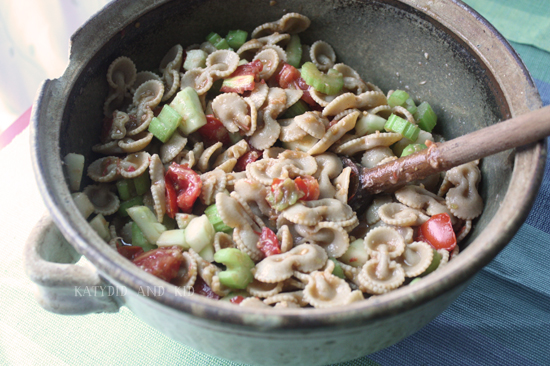
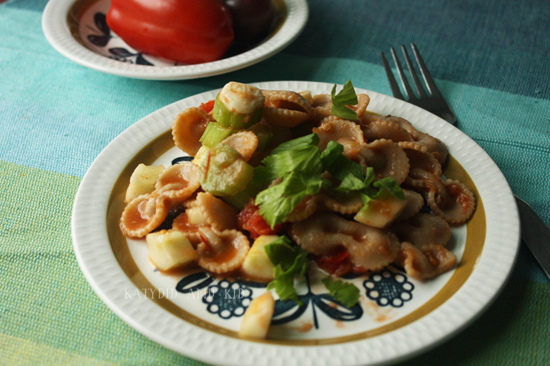
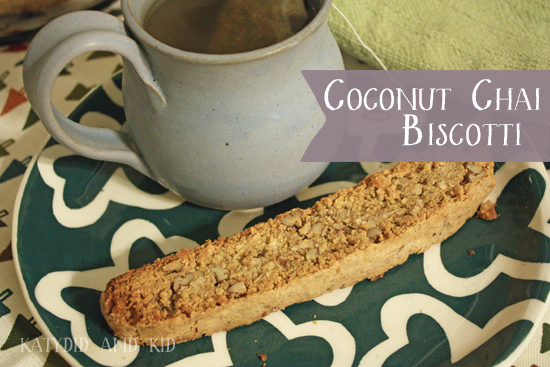
BLOODY MARY BOWTIE SALAD
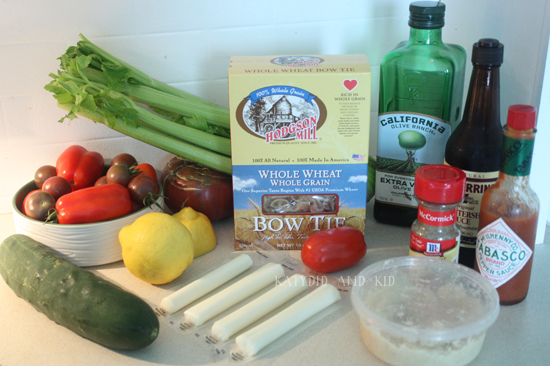
serves 4-6

Ingredients

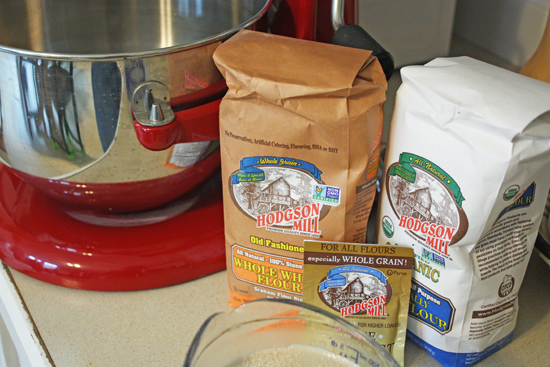
  • 10 oz. box of Hodgson Mill whole grain bowtie pasta
  • 3 ribs of celery, sliced
  • 1 cucumber, peeled and de-seeded, diced
  • 2 plum tomatoes, diced
  • 1/2 cup finely chopped vidalia onion (alternately, you could shred it on a grater)
  • 2 mozzarella cheese sticks, sliced into bite-sized pieces
  • chopped celery leaves, for garnish
Dressing
  • The juice of 1 lemon
  • 2 tbsp Worcester sauce
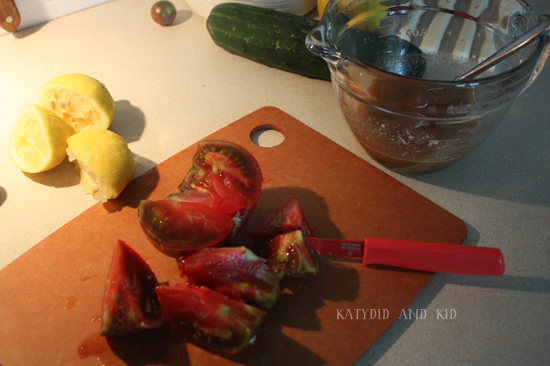
  • 1 small, ripe tomato, roughly chopped
  • 1 tsp Tabasco or hot sauce (or more or less, to your liking)
  • 1 1/2 tsp celery salt
  • 1 tbsp horseradish
  • 3 tbsp olive oil
  • 1/2 tsp of black pepper (or more or less, to your liking)
  • additional salt or celery salt, to your liking
Cook the pasta according to instructions.  Set aside to cool, slightly, then transfer to a large bowl.  Add the chopped celery, cucumbers, tomatoes and onion and gently toss to combine.

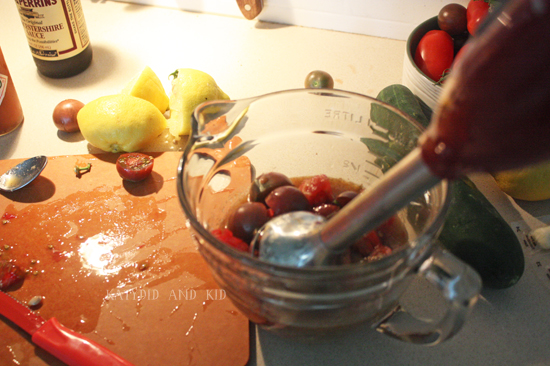
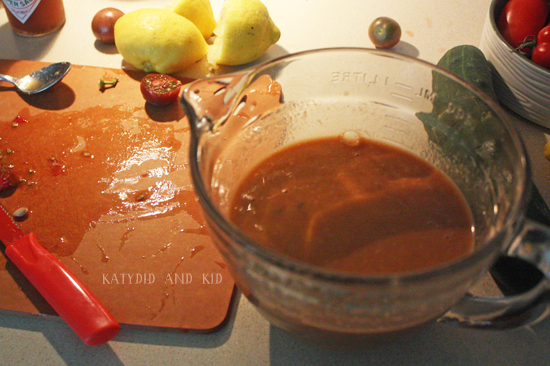
In another bowl, combine the ingredients for the dressing, adding the additional chopped tomato.  The riper the better!  This heavy purple one was nearly falling off the vine.
After you add it to the bowl, puree the dressing with a hand blender or in a food processor or blender to make the dressing.  If you don't have these items, you could mash it by hand and run it through a sieve.
You'll get a nice, rich red dressing, which looks a lot like a Bloody Mary.
Pour this dressing over your bowtie mixture (maybe save a bit for a real Bloody Mary--just add the vodka to your glass), toss gently and chill for 30 minutes or until it's cold.  Then add in the sliced mozzarella sticks.
Feel free to add a splash more hot sauce or Worcester sauce if you'd like a stronger, more pungent taste.  Garnish with celery leaves and serve cold.  Enjoy!
SWEEPSTAKES
From now until 08/09, enter to win the Summer Pastabilities Gift Pack Give-a-way sweeps from Hodgson Mill! You could win a $50 prize pack filled with quality Hodgson Mill Whole Wheat pasta, a copy of the Hodgson Mill Whole Grain Baking Book, and more.

COUPON
This summer you can also take $1 off any variety of Hodgson Mill Whole Wheat pasta! Coupon available at: http://bit.ly/PASTA2013
STAY CONNECTED
  • Want to receive Hodgson Mill coupons, offers, giveaways, and new recipes before they’re unveiled to the public? Join the email newsletter!
  • Need dinner ideas? Check out the Hodgson Mill blog for healthy, seasonal, and delicious inspiration.
  • Join the community on the Hodgson Mill Facebook page.
  • For more foodie inspiration, follow Hodgson Mill on Pinterest!
WIN IT!
And for all of you lovely Katydid and Kid readers, Hodgson Mill is giving away $25 in their products.  To enter, just leave a comment on this post about your favorite item in their online store or what you'd like to make with their pasta.  Good luck!
Disclosure: I received samples of Hodgson Mill products to facilitate this recipe, and I'm participating in a chance to win a prize in this contest.


February 1, 2024

Inspiring New Books from Roost: Imagine Childhood and I Love Dirt {Giveaways}

Do you get as excited as I am when a new book comes out from one of your favorite blogs or bloggers?  I recently bought and devoured the Young House Love book this month, but also got to peruse a copy of Imagine Childhood: Exploring the World through Nature, Imagination and Play by Sarah Olmsted.
It's pretty incredible how in this day and age, one can pour their creativity and talent into a blog, and then turn it into a book, and Sarah Olmsted did just that.  Well, actually, her Imagine Childhood website is part shop/part blog/ part community forum, but regardless, it's inspired parents and kids everywhere to explore their natural surroundings and their imagination. 

The book is a perfect complement to the online Imagine Childhood site.  It's filled with open-ended projects like creating outdoor houses out of dirt or leaves (both for big kids and little dolls/figures), making boats out of simple materials like newspaper, and sparking one's imagination through activities like nature walks, costumes, and creating play forts and magical spaces.  Quite a testament to hands-on learning, for sure.

I love this quote from the book's introduction.  I think it sums up the book perfectly.
Nature teaches us how the world works.
Imagination teaches us how to dream.
Play teaches us how to make our dreams real.
                               --Sarah Olmsted.

Imagine Childhood would make a wonderful addition to your home library or a friend's.  I think it would encourage not only children to explore the world of imagination and play, but adults as well.

Speaking of play and nature, I Love Dirt!: 52 Activities to Help You and Your Kids Discover the Wonders of Nature by Jennifer Ward is another fun new release from Roost.
I can't wait to get this book dirty when using it on walks and trips to the park.  I Love Dirt contains 52 short but inspiring ways to immerse your kids and yourself in playful yet dirty activities.

It's divided into seasonal sections, all of which have ways to explore nature through art, science, writing, and simple observation.   It's really applicable to country-dwellers who live in climates with dramatic seasons, like myself, however anyone can use this book, no matter where you live.  Those living in warm locations will probably not be able to do any of the snow-related activities, however there are suggestions for other ways to get the most out of the seasons.

I want to raise my boys with a close connection to nature, and I Love Dirt is a creative catalyst for getting us outside to explore the world, no matter the season or weather. 

WIN IT!

One lucky reader will win a copy of Imagine Childhood and another lucky reader will win a copy of I Love Dirt!  Please enter via the Rafflecopter widgets below (you can leave one comment in the post for both giveaways; no need to duplicate).
a Rafflecopter giveaway

a Rafflecopter giveaway

Disclosure: I received copies of the books reviewed here.  All opinions are my own.

December 6, 2023

The Farm Chicks Christmas from Country Living {Giveaway}

When it comes to decorating with a vintage, country flair, The Farm Chicks are experts.  I've admired their work in Country Living magazine, as well as on their website and blog.  While one half of the duo is now retired, Farm Chick Serena Thompson is still creating projects to inspire homemaking, cooking and entertaining.
Thomson is shown in the book above, wearing the red coat
The Christmas book, The Farm Chicks Christmas, now available in paperback, is filled with ideas and tips for creating a welcoming atmosphere in your home for the holidays.
From baking to decorating to crafting, The Farm Chicks Christmas is a great resource for creative and non-creative types.  There are simple ideas like stacking vintage books, spelling out Christmas-y words with Scrabble tiles, and covering cones in fabric,
as well as more involved projects like a holiday scalloped bunting and felt gift card holders
The book is peppered with Serena's stories of family and friends, where she writes of Christmas traditions shared with the ones she loves.  The accompanying photography is gorgeous, whether its subject is a visit to a tree farm to cut down a Christmas tree, or of the beautiful interiors decked out in vintage charm.
Also included are three pages of cute note cards and stickers, which I'm eager to use to accentuate handmade gifts this year.
The Farm Chicks Christmas is a visual delight, and will be a festive resource that I look forward to opening up every December to inspire a homemade and homey Christmas.

WIN IT!

One lucky Katydid and Kid reader will win a copy of The Farm Chicks Christmas!
Please enter via Rafflecopter below:
a Rafflecopter giveaway

Disclosure: I received a copy of The Farm Chicks Christmas for review.  All opinions are my own.

December 4, 2023

Fresh from the Oven: The Old Farmer's Everyday Baking Almanac {Giveaway}

Many of my go-to dishes are from The Old Farmer's Almanac cookbook, which I received as a gift a few years ago. I reference it all the time for classic dishes like macaroni and cheese and biscuits.  Naturally I was eager to see that they've published a cookbook especially for baking--The Farmer's Everyday Baking Almanac.
It's as good as my original book, and especially handy this time of year.  I made the Pecan-Top Apple Pie last month which came out perfectly.
I do wish I had dressed it up with the recommended Caramel Sauce, however I didn't have the time to do so.  Though the pie was sweet enough on its own.

I like that the Everyday Baking Almanac includes tips and tricks for better baking, like why the best way to use eggs is at room temperature (cool eggs affect the consistency of butter and other room-temperature ingredients in the dough).

I do wish that the book was more substantial in appearance; it has the look and feel of a magazine, rather than a book.  While the amount of recipes is great (118), I wish it was available in hardcover or was spiral bound for posterity.  The photography is excellent, and unlike the Everyday Cookbook, most recipes have a photo to go along with them, which is something I appreciate.

There are so many tempting recipes in this book, like the Chocolate Mud Bars. They might be great with a teaspoon of peppermint extract and some crushed candy canes to make them more festive for the Christmas season.

CHOCOLATE MUD PIE BARS

From The Everyday Baking Cookbook, page 54

CRUST:

1 ¼ cups graham cracker crumbs
3 tablespoons packed light-brown sugar
¼ teaspoon cinnamon
Pinch of salt
5 tablespoons unsalted butter, melted

FILLING:

½ cup (1 stick) unsalted butter
6 ounces semisweet chocolate, coarsely chopped
¾ cup sugar
2 large eggs, at room temperature
½ teaspoon of vanilla extract
¼ cup cake flour
1 cup coarsely chopped walnuts

DIRECTIONS:

Butter an 8-inch square baking pan and set aside.

For crust: Combine the graham cracker crumbs, brown sugar, cinnamon and salt in a medium bowl. Mix well with your hands. Add the melted butter, stir well with a fork, then rub the ingredients together well with your fingers until thoroughly mixed. Press the mixture evenly in the prepared pan to form a level layer on the bottom with a lip extending about ¼ inch up the sides of the pan. (Do not prebake the crust).

For filling: Combine the butter and chocolate in the top of a double boiler over not-quite-simmering water. When melted, whisk to smooth, then remove the pan from the heat. Scrape the chocolate into a medium bowl and cool to lukewarm. Preheat the oven to 325 degrees F. Whisk the sugar, eggs, and vanilla into the lukewarm chocolate. Stir in the cake flour, mixing until smooth. Stir in the walnuts. Scrape the batter over the crust and smooth with a spoon. Bake on the center oven rack for 35 minutes only - no longer. Cool on a rack. Refrigerate an hour or so before slicing. Serve at room temperature. Makes 16 bars.

WIN IT!
For you bakers out there, I have a copy of The Everyday Baking Almanac to give away!  Please enter via Rafflecopter below:
a Rafflecopter giveaway

Disclosure: I received a copy of the Everyday Baking Almanac for review.  All opinions are my own.

December 3, 2023

Coconut Chai Biscotti {Plus a Giveaway}

Chris has been begging me to make biscotti for ages.  He loves dry, dunk-able cookies perfect for pairing with coffee or tea.  In addition to this sweet confection, he loves chai tea, so I thought it might be great to combine the two into one recipe.
I was contacted again by Hodgson Mill, this time to create a recipe for their "Have a Grain Holiday" challenge, so I thought Coconut Chai Biscotti would be perfect.  It uses a blend of whole wheat flour, cornmeal, and all-purpose flour, as well as nuts, chai spices and coconut.  I'm a fan of Hodgson Mill products, since they're made without GMOs and are made with 100% whole grains, and no artificial colors or preservatives.

COCONUT CHAI BISCOTTI

Ingredients

  • 3/4 cup Hodgson Mill whole wheat flour
  • 1/2 cup Hodgson Mill pastry flour
  • 1 1/4 cup Hodgson Mill yellow cornmeal
  • 1 tsp cinnamon
  • 1 tsp ground ginger
  • 1/2 tsp ground cloves
  • 1/2 tsp cardamom
  • 1/2 tsp coriander
  • 1/4 tsp black pepper
  • 1/2 tsp baking powder
  • 1/2 tsp salt
  • 6 tbsp softened butter (you can substitute coconut oil for half of the butter)
  • 1 cup sugar
  • 1 tbsp orange juice
  • 2 eggs
  • 1 tsp vanilla extract
  • 1 cup chopped pecans (or other nuts)
  • 1 cup packed coconut (if using sweetened, reduce sugar by 1/4 cup)

Directions

Preheat oven to 350 degrees.  Spray a non-stick 9x13 sheet pan and set aside.

Whisk together the first 11 ingredients (flours, spices, etc.) and set aside.  With a hand or stand mixer, cream the butter and sugar until light and fluffy.  Add the eggs, one at a time, then the vanilla and orange juice and beat on low until smooth.  Add the dry ingredients all at once and mix on low until just combined.  Then add the coconut and nuts and mix again until just combined.
Transfer the dough onto the sheet pan and pat into a 6"x12" rectangle (a piece of wax paper put on top helps to keep your hands from sticking).
Bake for 30-35 minutes on the middle rack, watching for cracks to appear in the top of the dough.  Remove from the oven and carefully transfer the cookie to a cutting board.
With a serrated knife, carefully slice the cookie into 1 inch slices.  TIP: Use the knife as a saw, and don't push down on the knife--let the teeth do the work.
Carefully transfer the slices back onto the baking sheet, spaced about an inch apart.
Bake for 15-20 minutes, until the edges are browned.
Enjoy with tea, coffee, milk or by themselves.
Chris' only complaint is that there isn't an endless supply of these.  That's enough of  a complement for me!  I think I'll double the recipe next time.
You can download a coupon for $1 off any 5 lb. bag of Hodgson Mill flour, good until December 31, 2012.  I'll definitely be using it toward my holiday baking needs.

And be sure to enter the Baker's Holiday Gift Pack Sweepstakes!
Just head on over to the Hodgson Mill's website to enter.  You can also enter my giveaway to win an assortment of flours.

 WIN IT!
One lucky reader will win their own Have a Grain Holiday prize pack, which includes the flours I used.  Enter via Rafflecopter below:
a Rafflecopter giveaway

Disclosure: I received a variety of flours from Hodgson Mill in order to facilitate this recipe.

October 11, 2023

Updating the Bathroom {and an Uncommon Goods Giveaway}

We've been enjoying our upstairs bathroom for a few months now, having had it gutted and renovated over the summer.  It's so nice not to cringe when taking a shower and having to avoid touching the walls.
However, our downstairs bathroom was feeling a bit left out.  While we don't have the budget to do a complete renovation right now (which like its upstairs sibling prior to the summer, it desperately needs), I do like to update it now and then with fabric and accessories (and paint, if I'm feeling especially ambitious).  I might have even mentioned in a past post the I covered up its ugly yellow tiles with contact paper. 
To spruce up this bath, I made a simple pleated sink skirt for our lovely old sink (it really isn't so lovely underneath it), and actually gave the basin a good cleaning with Bon Ami.
I found the fabric a while ago at Joann and it's been waiting to be put to use.  There was enough to make a simple no-sew valance too.  Stitch witchery is your friend.
As usual, I shop around the house changing out wall art and other things when I feel the urge to feather the nest.  I scavenged the Ikea tray and tin animals that hang on either side of the mirror from Jude's nursery.
Rather than the usual cardboard box of tissues, I decided to forgo the patterns (tissue boxes really have come a long way design-wise, huh?) and use a neat-o modern Paper Pot from Uncommon Goods.
Have you ever checked out their website or catalog?  It's pretty incredible, the unique and useful things they carry.

The Paper Pot is a contraption that holds your tissues or toilet paper inside a funky ball.  You unscrew the two parts, then lay your tissues on top of the roller bar or slide the bar through your toilet paper roll.  Then out pops your paper.
It comes in five colors (I really should have chosen blue or orange, but thought that white would go with anything) and is really eye-catching in its minimal design.  I hope the manufacturer adds some more colors, like yellow or grey to the mix.
It's also functional in that when I pull out a tissue, the pot doesn't move like tissue boxes often do.  And so far I haven't had any clumps of tissues come out the way I often do with the paper boxes.  But mostly, it's just looks really cool in the bathroom.  I'd love a few more throughout the house.  It would actually make a great Christmas gift for me (hint hint), as would many of the other items that I found here.

Uncommon Goods has so many other home, office and personal goods.  I'm eager to check out some ideas for Christmas gifts too, which you can find HERE.  I always have trouble picking out items for girls, like friends' daughters and nieces, so I'll definitely be checking out the suggestions for girls that at Uncommon Goods.  Uncommon Goods is a website you could browse for a long time and still have trouble picking a favorite item.

WIN IT!
One lucky reader will win their own Paper Pot!  Please enter via Rafflecopter below:
a Rafflecopter giveaway

Disclosure: I received an item of my choice from Uncommon Goods for review.

October 9, 2023

I Can't Believe It's Butternut Squash Pizza {Giveaway}

You might remember my prior post using Hodgson's Mill products, the Summer Pastabilities Challenge?  Well, I don't think I mentioned that my recipe, the Spaghetti Southwestern Pasta Salad, which was tested out by professionals, actually won second place! 

So here I am again, competing in another blogger contest with Hodgson Mill, this time in the Build a Better Pizza challenge.

It's fall, and the craving for fall foods like pumpkin bread and apple cider have kicked in.  But for me, I really have been smitten with butternut squash and kale, so I thought I'd create a pizza around those toppings.  Add in some sage and some late summer roasted tomatoes and you have the makings for an unusual and hearty pizza.
I CAN'T BELIEVE IT'S BUTTERNUT SQUASH PIZZA
(makes 2 10" pizzas)
For the Pizza Dough
1 c warm water 
1 pkg. HODGSON MILL ACTIVE DRY YEAST 
1 1/2 c HODGSON MILL WHOLE WHEAT GRAHAM FLOUR 
1 1/2 c HODGSON MILL ORGANIC WHITE UNBLEACHED FLOUR
2 tsp. olive oil 
1/2 tsp. salt 
For the topping
1/2 butternut squash, sliced into 1/4" pieces
3 plum tomatoes, cut into 1" pieces (I used small whole plum tomatoes)
6 large kale leaves, de-stemmed and chopped
1 medium red onion, finely chopped
1 clove garlic, minced
1 tbsp olive oil
small bunch of fresh sage leaves (I used 8) or 1 tsp dried sage
1 tsp sugar
1 tsp balsamic vinegar
salt and pepper to taste
8 oz smoked cheddar, shredded

Combine the water, yeast and 1/2 of the whole wheat flour in a large bowl. Add the remainder of flour, oil and salt. With hands, a large wooden spoon or a mixer, work the ingredients together until the dough holds its shape.

You may need a bit less flour, so add the last of the flour gradually. Place the dough on a lightly floured surface and knead until smooth and elastic-about 8 to 10 minutes. If the dough becomes sticky, sprinkle a bit of flour over it.

Transfer dough to a lightly oiled 2 qt. bowl. Cover the bowl with plastic wrap or a damp kitchen towel and let rest until it has doubled in size, about 1 hour.
Meanwhile, prepare your topping.  Preheat the oven to 350 degrees F and toss the butternut squash and tomatoes with olive oil.  Sprinkle with salt and pepper, then roast for 45 minutes or until tender.  In a pan, heat a tablespoon of olive oil, then add the sage leaves and onion and cook until soft.

Add the garlic and kale and sautee until softened.  At this point, I added the roasted tomatoes (they were already finished roasting, as I started the sautee a few minutes before the roasted vegetables were done), then mashed them with the back of a spoon. 
Add the teaspoon of sugar and the teaspoon of balsamic vinegar and cook for a few minutes more.  Set aside to cool.

When the dough has risen, place on a lightly floured surface, divide into 2 or more parts and roll into balls. Cover with a towel and let rest for 15-20 minutes. The dough is now ready to be shaped, topped and baked.   Preheat the oven 425 degrees F and flatten the balls into pizzas.  Add the topping, layering the butternut squash on top.
Top with the shredded cheddar, and bake at 425 degrees F. until cheese is melted and crust is browned.
Delicious and a perfect way to usher in a fall evening.  And please VOTE FOR MY RECIPE in the contest on Hodgson MIll's Facebook Page!
WIN IT!
Hodgson Mill is giving one lucky reader the ingredients to build a better pizza with a $25 pizza prize pack with the flours and yeast you'd need.  Enter via Rafflecopter below.
a Rafflecopter giveaway

Disclosure: I received flours and yeast from Hodgson Mills to facilitate this post.

September 27, 2023

Pumpkin Spice Whoopie Pies

The smells of fall are intoxicating--wet leaves, the inside of a freshly carved pumpkin, bonfires, and of course the smells coming from fall baking in the kitchen.

Pumpkin bread, spice muffins, maple scones, apple cakes, I've made them all.  But I ventured to try something new this week: Pumpkin Spice Whoopie Pies.
I live in Pennsylvania Dutch country, so we come across whoopie pies at nearly every Mennonite or Amish farm stand in the area.  While I tend not to be a fan of this dense, grainy, and super sweet confection, the ones I made using Wilton's recipe and tools were delicious.
I was sent a Harvest Whoopie Pie pan and a variety of embellishments like sprinkles, melting chocolates and sanding sugars to create some delicious treats.

Wilton's Pumpkin Spice Whoopie Pies are light and reminiscent of a pumpkin bread sandwiching a cream cheese filling.  The Harvest Whoopie Pie pan and its pumpkin and leaf shapes makes the dessert even more special.

PUMPKIN SPICE WHOOPIE PIES (makes 15)

Ingredients:

  • 1 1/2 cups all-purpose flour
  • 1 teaspoon ground cinnamon
  • 1 teaspoon baking soda
  • 1/2 teaspoon baking powder
  • 1/2 teaspoon salt
  • 1/4 teaspooon ground nutmeg
  • 1/8 teaspoon ground cloves
  • 4 tablespoons (1/2 stick) butter, softened
  • 1 cup granulated sugar
  • 2 eggs
  • 1/2 cup solid pack pumpkin
  • 1/2 cup buttermilk
  • Filling
  • 1 package (8 ounces) cream cheese, softened
  • 1/2 cup confectioners' sugar
  • 1/2 teaspoon clear vanilla extract

Instructions:

Preheat oven to 350 degrees and spray the pan with vegetable oil (I recommend flouring the pan too, to prevent sticking).  In a medium bowl, combine flour, cinnamon, baking soda, baking powder, salt, nutmeg and cloves. In large bowl, beat butter and granulated sugar with electric mixer until fluffy. Add eggs, one at a time, beating well after each addition.

Add flour mixture to butter mixture alternately with pumpkin and buttermilk, mixing thoroughly after each addition.  Fill pan 1/2 full, spreading batter to edges of cavities.
Bake 7-9 minutes or until toothpick inserted in middle comes out clean.
Cool in pan 5 minutes; remove to cooling rack. Cool completely before filling.
For filling, beat cream cheese, confectioners’ sugar and vanilla together until well combined. To assemble, spread filling on one cake and sandwich with another.
I embellished mine with some leaf sprinkles by dipping the edges in a bowl of them.
 I had a little sprinkle-tasting help.  They passed inspection with flying fall colors.
Wilton's Pumpkin Spice Whoopie Pies are a delicious way to add some variety into your fall baking.  I can definitely see using the pan for other fall treats like cookies and shortbread.
You can find more recipes, materials and baking inspiration at Wilton.com or via their Facebook page, Twitter, and Pinterest.

Disclosure: I received sample products from Wilton to facilitate this review.  All opinions are my own.
Related Posts with Thumbnails