


We've finally enjoyed a fully warm week of spring here, and now I have true spring fever on the brain, evidenced by the flats of flowers ready to be planted in the hanging baskets on the porch.
I'm so eager to get back into the dirt, even with my newly non-bitten fingernails (success! Though how do you keep dirt from getting under them, veteran pretty-nail-people?).
I've been decorating the front porch for hanging out in warmer weather, mostly gathering things from around the house, like cushions and extra curtains
and I even painted the front and back doors to spruce things up.
Tomorrow we're heading to the opening day of Sesame Place, since I was asked to be part of their social media Ambassador program. Woo hoo! I can't wait to see Soren having fun tomorrow, and hopefully throughout the season. Naturally, I'll be updating about our experiences here as well as on my Facebook page and Twitter.
What are your weekend plans? Anyone else eager to make over their outdoor spaces? If so, you should go enter the Pier 1 giveaway at Tatertots and Jello. I did! Enjoy the weekend, friends.
April 29, 2023
April 27, 2023
Easter Wrap-Up and My Big Belly
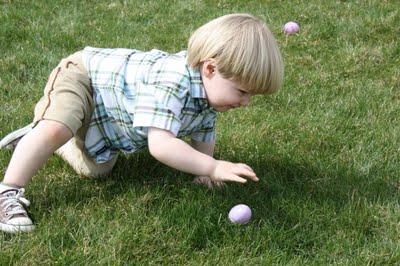
Easter was gorgeous here is PA, so we spent as much time outside as we could, with an egg hunt
and chocolates, of course, which S happily shared.
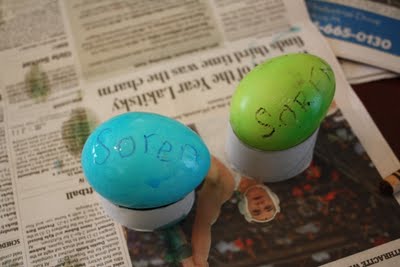
My dyed brown eggs came out ok, much deeper colors than on white eggs.
Though I think I used too much vinegar, which seemed to make the dye flake off. Oh well, the eggs were still perfectly cooked, and were delicious on our Easter dinner, a Nicoise Salad with Salmon.
What did you have for dinner? I hope it was as tasty as ours.
In other world news, I'm getting huge!
Here I am filling holes in the walls of the nursery. This belly is out of control, as is my hunger. We spent some of the weekend organizing, donating, and trying to clear things out for the baby. Our attic looks spectacular, and I feel so much more organized about baby things.
I'll also share a little secret: this month I'll be working with Parents.com and Chase Financial with a makeover of the nursery. I'm so excited, and ready to start working, or more accurately, ready to start directing others to start working (like friends and family). You know, my belly is just too big and all for all that bending! Stay tuned for more on the nursery project this May.
And if you have a moment and don't mind clicking over to Belli Beautiful, I entered that huge belly in a photo contest and hope to win some pampering goodies. It just takes one click to vote, no signing up or anything. My belly thanks you for your support!
and chocolates, of course, which S happily shared.
My dyed brown eggs came out ok, much deeper colors than on white eggs.
Though I think I used too much vinegar, which seemed to make the dye flake off. Oh well, the eggs were still perfectly cooked, and were delicious on our Easter dinner, a Nicoise Salad with Salmon.
What did you have for dinner? I hope it was as tasty as ours.
In other world news, I'm getting huge!
Here I am filling holes in the walls of the nursery. This belly is out of control, as is my hunger. We spent some of the weekend organizing, donating, and trying to clear things out for the baby. Our attic looks spectacular, and I feel so much more organized about baby things.
I'll also share a little secret: this month I'll be working with Parents.com and Chase Financial with a makeover of the nursery. I'm so excited, and ready to start working, or more accurately, ready to start directing others to start working (like friends and family). You know, my belly is just too big and all for all that bending! Stay tuned for more on the nursery project this May.
And if you have a moment and don't mind clicking over to Belli Beautiful, I entered that huge belly in a photo contest and hope to win some pampering goodies. It just takes one click to vote, no signing up or anything. My belly thanks you for your support!
April 22, 2023
Easter Weekend Musings
Since I'm not a ham and beans kind of gal, I've decided I'm going to make a Nicoise Salad for our Easter dinner this year. I love the combination of greens, fresh spring veggies, potatoes, eggs and fish, and think it's a salad that can really hold its own as a meal.
I'm also thinking of making a cake for dessert, like this one:
I love the combination of raspberry and lemon, though I probably won't end up making cookies for decorating it--maybe just coconut and berries. My aunt used to make an amazing lamb-shaped coconut cake every year, though I'm not feeling so ambitious or wanting all those leftovers.
Since we're getting together with my family on Saturday for my mom's birthday dinner, we're going to spend Easter at home this year. Probably a little egg hunt in the backyard for S, and take a walk over to the park. There's an egg hunt there on Saturday, which was fun last year due to the Easter Bunny and a firetruck.
 Hope your weekend is peaceful and spent with those you love! Happy Easter, friends.
I'm also thinking of making a cake for dessert, like this one:
I love the combination of raspberry and lemon, though I probably won't end up making cookies for decorating it--maybe just coconut and berries. My aunt used to make an amazing lamb-shaped coconut cake every year, though I'm not feeling so ambitious or wanting all those leftovers.
Since we're getting together with my family on Saturday for my mom's birthday dinner, we're going to spend Easter at home this year. Probably a little egg hunt in the backyard for S, and take a walk over to the park. There's an egg hunt there on Saturday, which was fun last year due to the Easter Bunny and a firetruck.
Below: photo from last year's backyard hunt at my in-laws'.
And a photo from the Easter party at a friend's house yesterday. I"m always shocked by the changes one year brings.
I haven't decided if we'll dye eggs, given that I have a dozen brown ones on hand that don't take too well to natural dyes. We dyed a few at the party yesterday (along with fingertips, after S dipped them into the cups!)Decoupaged Laundry Room Art
Springtime always inspires me to start sprucing up the house and updating our living space. I have about a half-dozen projects going on both in my mind and in the house right now, and am excited to share with you one that I actually finished.
I used Elmer's Glue products to complete the project, as well as an X-Acto knife (best tool ever!) to create this simple artwork for my laundry room, a room which is in need of a little facelift.
Elmer's has complied a really wonderful Spring Creation Guide (it's in PDF form), which has so many interesting and inspiring projects that go beyond the construction paper bunnies that you're probably used to seeing with their products.
Have you ever decoupaged with Elmer's products? They have a tutorial for a decoupaged table on their website that has my brain flooded with possibilities for projects in my home. Though a laundry makeover might require a projects like this Laundry Jar, which is rated easy on Elmer's scale.
So back to my project. I took a blank canvas from the craft store, and decided to make a simple, modern artwork that is befitting of the laundry room. I intended on doing a large clothespin, but was not happy with how my design was coming along. The hanger seemed like an appropriate image for laundry, and was so simple to make.
Here's what I used:
Paint your canvas whatever color you wish, preferably one that coordinates with your decorative paper. In my case, I wanted my image to pop out, so I chose black.
Two coats should work nicely. I painted the first one horizontally, and once dry, painted another coat vertically, to make the texture look a bit like linen.
STEP TWO
Lay out your large sheet of paper. It really only needs to be a scrap piece, even with writing on it, since we'll be gluing on top of it. Admit it--you're diggin' my old Dot Matrix printer paper.
Then using your decorative paper, start tearing long strips of the different papers. I like the ragged edge effect, which is what you're going for.
This is a great way to use up scraps. I then arranged my papers on my background paper, to figure out the pattern I wanted to make.
I like how it looks like denim jeans.
STEP THREE
With your Elmer's Glue Stick, glue your papers into place.
I started at one end, then overlapped each torn piece until I reached the other end.
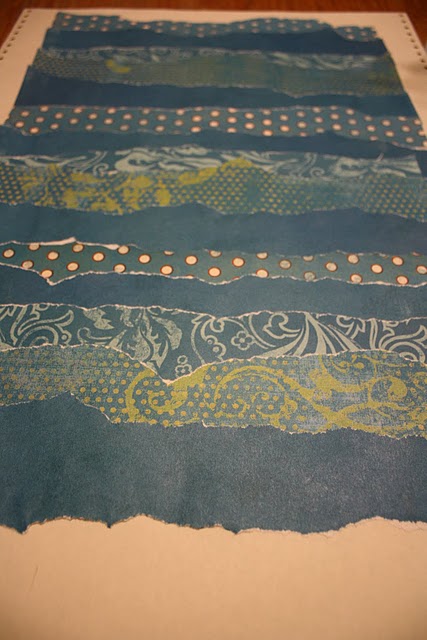
Here's the finished sheet of paper.
STEP FOUR
Next, I found a hanger whose shape I liked, and made sure its silhouette would fit on the paper.
You could certainly trace another object, or search online for "silhouette clip art" and enlarge an image you liked. I think this would make a nice project for a kids' room, with an initial or even a silhouette of the child's favorite animal.
For the hanger, I simply flipped the paper over on the back and carefully traced the hanger with a pencil.
STEP FIVE
With the X-Acto knife (or scissors), carefully cut out your silhouette.
Ta da! Paper hanger.
STEP SIX
Time to decoupage. Your canvas should be dry before this step. With the Elmer's Glue All, I made a solution of 3 parts Elmer's to 1 part water (for this project, 3 tbsp. Elmer's/1 tbsp. water worked fine) and mixed it with a foam brush.
Then I spread it over the canvas, centered the hanger on top where I wanted it, and spread another thin layer over the hanger and canvas.
When dry, I added another thin layer, just for good measure. Then I was ready to hang it after I let it sit overnight.
I love how it turned out!
I saved the scraps too, for another silhouette project. I could easily become a decoupage addict.
Disclosure: Elmer's sent me some of their glue products, an X-Acto knife, and a gift card for purchasing craft items to create a craft and post about it.
I used Elmer's Glue products to complete the project, as well as an X-Acto knife (best tool ever!) to create this simple artwork for my laundry room, a room which is in need of a little facelift.
Elmer's has complied a really wonderful Spring Creation Guide (it's in PDF form), which has so many interesting and inspiring projects that go beyond the construction paper bunnies that you're probably used to seeing with their products.
Have you ever decoupaged with Elmer's products? They have a tutorial for a decoupaged table on their website that has my brain flooded with possibilities for projects in my home. Though a laundry makeover might require a projects like this Laundry Jar, which is rated easy on Elmer's scale.
So back to my project. I took a blank canvas from the craft store, and decided to make a simple, modern artwork that is befitting of the laundry room. I intended on doing a large clothespin, but was not happy with how my design was coming along. The hanger seemed like an appropriate image for laundry, and was so simple to make.
Here's what I used:
- 18x24" canvas
- Elmer's Glue All
- Elmer's Tacky Glue
- Elmer's Glue Stick
- X-Acto Knife
- Decorative papers
- Large sheet of paper (roughly the size of your canvas)
- Acrylic paint/ foam brush
Paint your canvas whatever color you wish, preferably one that coordinates with your decorative paper. In my case, I wanted my image to pop out, so I chose black.
Two coats should work nicely. I painted the first one horizontally, and once dry, painted another coat vertically, to make the texture look a bit like linen.
STEP TWO
Lay out your large sheet of paper. It really only needs to be a scrap piece, even with writing on it, since we'll be gluing on top of it. Admit it--you're diggin' my old Dot Matrix printer paper.
Then using your decorative paper, start tearing long strips of the different papers. I like the ragged edge effect, which is what you're going for.
This is a great way to use up scraps. I then arranged my papers on my background paper, to figure out the pattern I wanted to make.
I like how it looks like denim jeans.
STEP THREE
With your Elmer's Glue Stick, glue your papers into place.
I started at one end, then overlapped each torn piece until I reached the other end.
Here's the finished sheet of paper.
STEP FOUR
Next, I found a hanger whose shape I liked, and made sure its silhouette would fit on the paper.
You could certainly trace another object, or search online for "silhouette clip art" and enlarge an image you liked. I think this would make a nice project for a kids' room, with an initial or even a silhouette of the child's favorite animal.
For the hanger, I simply flipped the paper over on the back and carefully traced the hanger with a pencil.
STEP FIVE
With the X-Acto knife (or scissors), carefully cut out your silhouette.
Ta da! Paper hanger.
STEP SIX
Time to decoupage. Your canvas should be dry before this step. With the Elmer's Glue All, I made a solution of 3 parts Elmer's to 1 part water (for this project, 3 tbsp. Elmer's/1 tbsp. water worked fine) and mixed it with a foam brush.
When dry, I added another thin layer, just for good measure. Then I was ready to hang it after I let it sit overnight.
I love how it turned out!
Disclosure: Elmer's sent me some of their glue products, an X-Acto knife, and a gift card for purchasing craft items to create a craft and post about it.
April 21, 2023
Easy Easter Craft
Have you been stepping on plastic eggs lately? I think it must be one a day at our house (where the heck have they all come from?), so last night, lying in bed, making mental preparations for today's Easter party with our playgroup, I came up with these:
 They're super-simple spring creatures that will use up some of those plastic eggs that seem to multiply like rabbits.
Here's what you'll need:
STEP ONE
Open up your egg. You'll notice that each half has 2 holes poked in it. You'll be threading pipe cleaners through these.
With the bottom section (the squat-er one), thread a pipe cleaner (actually I used half of one, just cut a large one in half) into one hole from the inside
and then out the other hole, also from the inside. It will look like this:
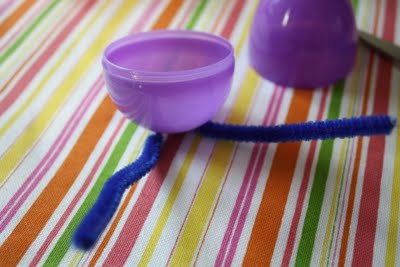 This will make the feet of your creature. You can then twist them into feet, or just bend them however you'd like.
STEP TWO
Do the same thing for the head. Thread a pipe cleaner through the inside holes again, then bend it into the shape you want.
This creature was a kind of Easter bug, with funky antennae. For the rabbit, I looped two ears, then twisted the pipe cleaner around itself at the base to secure the ears. For the duck/chick, omit this step.
STEP THREE
Add google eyes, round stickers, or even pieces of foam to make the eyes.
My google eyes had adhesive on the back already. To add other facial features, I cut shapes out of foam and stuck them to the egg with Glue Dots.
Glue stick or a dab of tacky glue should work fine too, though it will take longer to dry.
For the duck, I cut a beak and wings out of foam and added them to the yellow egg.
To finish, add a cotton ball tail to your rabbit, maybe a feather to your duck, and draw some whiskers and a mouth on the bunny with permanent marker.
These would be cute place settings at your Easter table, or just friendly additions to your Easter baskets. Have fun!
Here's what you'll need:
Plastic egg, pipe cleaners, googley eyes, glue stick, Tacky Glue, or Glue Dots, scissors, craft foam, permanent markers
STEP ONE
Open up your egg. You'll notice that each half has 2 holes poked in it. You'll be threading pipe cleaners through these.
With the bottom section (the squat-er one), thread a pipe cleaner (actually I used half of one, just cut a large one in half) into one hole from the inside
and then out the other hole, also from the inside. It will look like this:
STEP TWO
Do the same thing for the head. Thread a pipe cleaner through the inside holes again, then bend it into the shape you want.
This creature was a kind of Easter bug, with funky antennae. For the rabbit, I looped two ears, then twisted the pipe cleaner around itself at the base to secure the ears. For the duck/chick, omit this step.
STEP THREE
Add google eyes, round stickers, or even pieces of foam to make the eyes.
My google eyes had adhesive on the back already. To add other facial features, I cut shapes out of foam and stuck them to the egg with Glue Dots.
Glue stick or a dab of tacky glue should work fine too, though it will take longer to dry.
These would be cute place settings at your Easter table, or just friendly additions to your Easter baskets. Have fun!
Subscribe to:
Posts (Atom)

