


Simply suspend a balloon from the ceiling and watch them hoot and howl.
Most likely, other children will want to join in the fun too. This one always hams it up for the camera, in keeping with his silly personality.
Simple parenting at its best, though of course it's wise to keep an eye on things and not go and make a cup of coffee. Not like that happened or anything, no ma'm.
January 31, 2024
January 27, 2024
Brothers {this moment}
I'm linking up to Soule Mama's "this moment" today. Happy weekend friends!
({this moment}=A Friday ritual. A single photo - no words - capturing a moment from the week. A simple, special, extraordinary moment. A moment I want to pause, savor and remember.)
({this moment}=A Friday ritual. A single photo - no words - capturing a moment from the week. A simple, special, extraordinary moment. A moment I want to pause, savor and remember.)
January 26, 2024
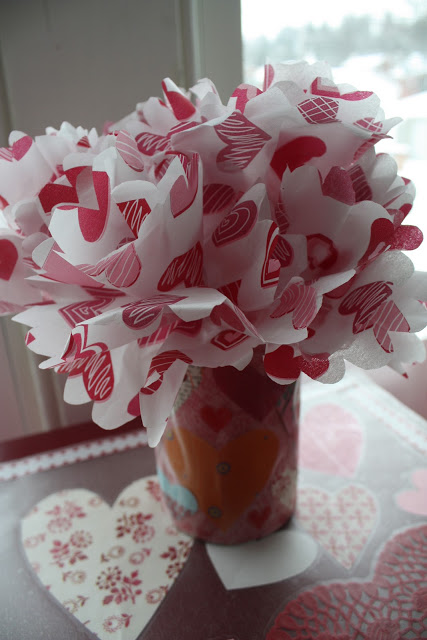
Paper Valentine's Bouquet
I believe my Valentine's Day crafting kick is a result of the doldrums of winter and the post-Christmas let-down; I'm trying to bring back some of the festivity and color into such a bleak time of year for me.
 With Valentine's Day, you don't have all the pressure of baking, decorating, wrapping, and general merriment to keep up with. How funny that in actuality, Chris and I never celebrate this holiday of love. We get to do that all year...seriously, we do cherish our relationship on a daily basis. My apologies for making you throw up in your mouth.
Anyway, while Soren and I had out all the paper hearts and stuff last week, I thought I'd recycle some salt containers and tissue paper scraps into a cute paper bouquet. This would be a sweet thing to give a teacher, librarian or grandparent. For us, it's sitting in our kitchen, brightening the space.
Here's what you'll need:
Cut off the top with a knife,
then measure the cylinder to size on the decorative paper. I added an inch at the top so I could fold it over and cover the edges.
Once you have your paper cut, cover the back with Mod Podge or glue. I stupidly used Elmer's Glue All, which ended up leaving wrinkles. Next time I'll use glue stick or something that doesn't wet and wrinkle the paper so much.
To finish the top, cut notches in the paper all the way around
then fold over and secure underneath with more glue.
Next, start adding your hearts. I had pre-cut a bunch from another project, which took no more than 5 minutes at that time. Fold a square of paper in half, then cut a candy cane shape.
Lots of sizes work best. You want to fill in the vase as much as you can.
Here is the finished vase, ready to be sealed either with Mod Podge or contact paper.
I chose to use contact paper--no surprise, given my plethora of contact paper projects as of late. I cut a piece to size, then rolled it over the outside of the vase, smoothing out any air bubbles.
Now on to the flowers. I cut some heart-printed tissue paper into circles
and fringed the edges by folding it into 4ths and cutting some scallops around the edge.
Don't worry about it being perfect--it doesn't matter!
Then I pinched it between my fingers
slipped the end of a pipe cleaner inside the fold.
Fold the pipe cleaner up, while still pinching the paper and the end of the pipe cleaner inside the paper,
and twist it around the stem of the pipe cleaner that's inside the "flower", holding the stem in place.
Fluff out the petals, and you're done. I made 5 for my vase, which gave it a full look.
Pretty and simple!
Anyway, while Soren and I had out all the paper hearts and stuff last week, I thought I'd recycle some salt containers and tissue paper scraps into a cute paper bouquet. This would be a sweet thing to give a teacher, librarian or grandparent. For us, it's sitting in our kitchen, brightening the space.
Here's what you'll need:
- Empty round cardboard container (oatmeal, salt, etc.)
- Red, pink, white, or even orange colored or decorative paper or paper doily hearts
- Scissors
- Glue (Mod Podge or glue stick works best)
- Contact paper (optional)
- Tissue paper in "Valentine's" colors
- Pipe cleaners
Cut off the top with a knife,
then measure the cylinder to size on the decorative paper. I added an inch at the top so I could fold it over and cover the edges.
Once you have your paper cut, cover the back with Mod Podge or glue. I stupidly used Elmer's Glue All, which ended up leaving wrinkles. Next time I'll use glue stick or something that doesn't wet and wrinkle the paper so much.
To finish the top, cut notches in the paper all the way around
then fold over and secure underneath with more glue.
Next, start adding your hearts. I had pre-cut a bunch from another project, which took no more than 5 minutes at that time. Fold a square of paper in half, then cut a candy cane shape.
Lots of sizes work best. You want to fill in the vase as much as you can.
Here is the finished vase, ready to be sealed either with Mod Podge or contact paper.
I chose to use contact paper--no surprise, given my plethora of contact paper projects as of late. I cut a piece to size, then rolled it over the outside of the vase, smoothing out any air bubbles.
Now on to the flowers. I cut some heart-printed tissue paper into circles
and fringed the edges by folding it into 4ths and cutting some scallops around the edge.
Don't worry about it being perfect--it doesn't matter!
Then I pinched it between my fingers
slipped the end of a pipe cleaner inside the fold.
Fold the pipe cleaner up, while still pinching the paper and the end of the pipe cleaner inside the paper,
and twist it around the stem of the pipe cleaner that's inside the "flower", holding the stem in place.
Fluff out the petals, and you're done. I made 5 for my vase, which gave it a full look.
Pretty and simple!
January 25, 2024
Winter's Late Arrival
Soren had a delightful weekend, reveling in a wintery playland when bestowed on us here in the Northeast. It's been an oddly mild winter, save for that freak Halloween snowstorm last year.
Saturday morning we woke to a few inches of snow, and a kid begging for me to take him out in it, nightgown and all. Once I got dressed, we headed out. Snow always makes me nostalgic for my childhood, especially when icy bits hang onto my gloves and my cheeks tingle with the cold. I hope my boys grow up with the same fondness for snow days that I have, and not the disdain that their dad has for the coldest season. So far, so good for Soren!
He LOVES snow, and we're lucky to have so many kids in our neighborhood to play with.
Naturally, he'd rather hit mama with a snow chunk than the other kids. Watch the lens, kid!
Down the block is a church whose parking lot of snow is eventually harvested into one awesome sledding and climbing pile.
It's always fun to bring the fun inside too, for hands to defrost around a mug of cocoa. Parents, I swear on this activity; S played off and on with the snow indoors for hours.
Just add little toys, and sit back with a cup of coffee and a magazine. Your work is done for a little while.
I hope you're enjoying winter's pleasures wherever you may be. Unless of course you're in the Southern Hemisphere. Then I'd prefer not to hear about your warm, sunny days lounging on a beach. :)
January 24, 2024
More Valentine's Fun with Contact Paper
So I've become somewhat addicted to the possibilities of contact paper. From covering membership cards to decorating and crafting, it's one kitchen aisle supply I'll keep around in our art cabinet.
This weekend I continued with the Valentine's Day vibe, making an easy display for our front door.
Other than some remnant fabric from IKEA covering the glass, this door is no-frills.
We have a full-glass door, and a full-glass storm door too, so we get some decent light through that window. It's nice to add some color to it without blocking the light, so contact paper and a few paper hearts worked well for adding some interest without compromising light.
As luck would have it, the roll of contact paper I had measured just an inch or so narrower than the window, which made for easy measuring. I took a measurement for length, cut the paper to size, then peeled off the paper backing, leaving the sticky side up.
Using some pre-cut paper hearts (some doily-ones from the craft store and some that I cut myself from decorative papers), I laid them in a random pattern all over the sticky side of the contact paper.
This is another easy project for kids to do. As long as they don't get carpet crumbs and hair onto the sticky surface (oops, that was me!).
In case you forgot those kindergarten heart-making skills, simply fold a piece of paper in half, then cut it out like this:
Once the hearts had been placed to my heart's desire,
I stuck the contact paper carefully to the window. It's a little tricky, but best to start at the top and work your way down slowly, smoothing bubbles as you go along.
For a large window like mine, it helps to have a helper, but I was able to do it myself without much difficulty. Thankfully contact paper is repositionable.
Here's the final result:
Bright and cheery, super-simple and cheap!
It certainly beats the standard wreath, and I love how it looks from the inside too.
There are so many possibilities with contact paper on windows. Why not give it a try?
This weekend I continued with the Valentine's Day vibe, making an easy display for our front door.
Other than some remnant fabric from IKEA covering the glass, this door is no-frills.
As luck would have it, the roll of contact paper I had measured just an inch or so narrower than the window, which made for easy measuring. I took a measurement for length, cut the paper to size, then peeled off the paper backing, leaving the sticky side up.
Using some pre-cut paper hearts (some doily-ones from the craft store and some that I cut myself from decorative papers), I laid them in a random pattern all over the sticky side of the contact paper.
This is another easy project for kids to do. As long as they don't get carpet crumbs and hair onto the sticky surface (oops, that was me!).
In case you forgot those kindergarten heart-making skills, simply fold a piece of paper in half, then cut it out like this:
Once the hearts had been placed to my heart's desire,
I stuck the contact paper carefully to the window. It's a little tricky, but best to start at the top and work your way down slowly, smoothing bubbles as you go along.
For a large window like mine, it helps to have a helper, but I was able to do it myself without much difficulty. Thankfully contact paper is repositionable.
Here's the final result:
Bright and cheery, super-simple and cheap!
It certainly beats the standard wreath, and I love how it looks from the inside too.
There are so many possibilities with contact paper on windows. Why not give it a try?
January 21, 2024
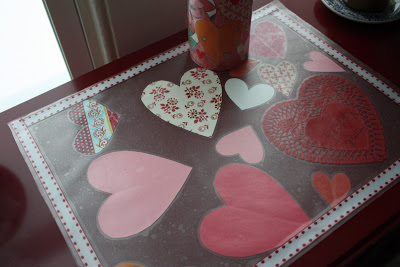
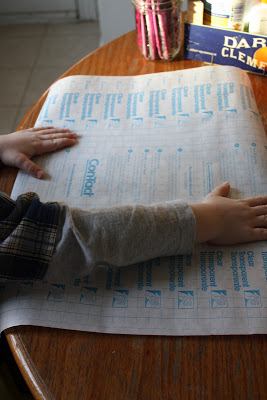
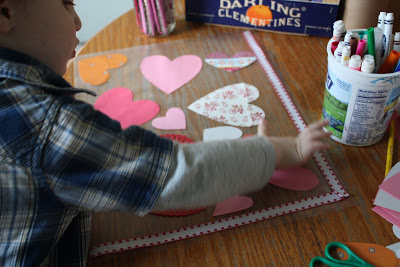
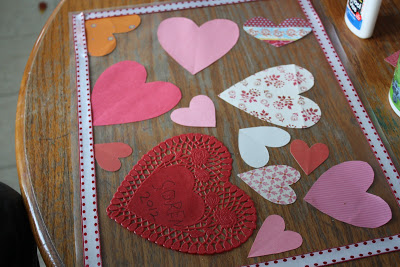
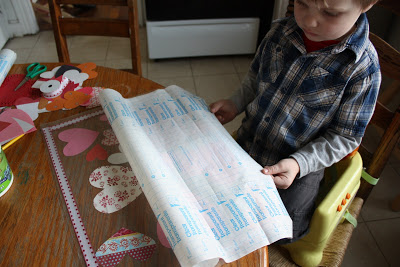
Kids' Valentine's Day Place Mat
SoJo and I embarked on a little crafting on Friday, with little mess (bonus points!). As a preschooler, he's been clued in to holidays now, and since Valentine's Day is on the horizon, he's been asking about making Valentines for his classmates (making! Yes, how sweet! I'm such a proud art-mama).
While on a January organizing kick, I stumbled upon a paper bag of cut-out hearts that I made last year for a playdate party, and thought I'd invite him to make an easy place mat for the table.
 The biggest challenge? Explaining what a place mat is. We don't really use them in our home, mostly since S would just toss them on the floor all the livelong day anyway. And they're one more thing on the list of stuff to clean.
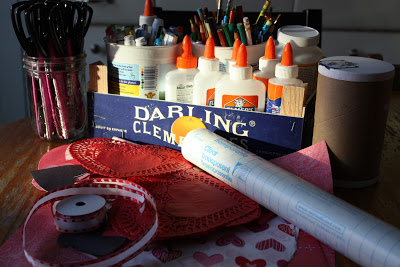
 So using some clear contact paper, we got to work. We pulled out a bunch of art supplies (some of which are for another project, which I'll post soon) to use.
 Soren helped roll out the contact paper, then I cut it to the size of a place mat. I then cut another piece to the same dimensions.
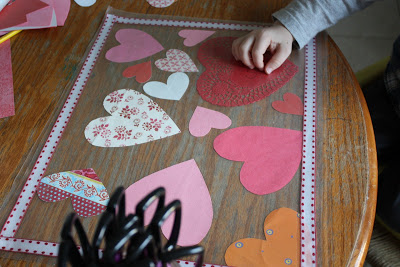
 I peeled off the backing, then had him place the hearts all over the sticky side. He loved sticking his finger onto it.
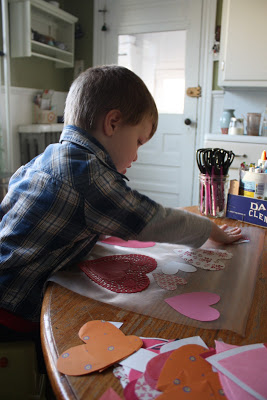 Then I cut some ribbon to "frame" the edges and had him smooth it into place.
 Once he was happy with where he placed the hearts, we wrote his name and the year on the biggest one for posterity.
 Then I took the second piece and peeled away a bit of the backing. I lined up the top edges, then had S pull the backing. As it unrolled, I pressed the top piece down, adhering it to the bottom piece.
 Then I told him to "use his muscles" and rub the hearts and contact paper so it stuck together.
 Trim the edges, and you're ready for a snack.
 Older kids would have fun creating their own hearts or images. With my preschooler, it worked better having the paper hearts already cut out and available in lots of sizes and colors.
This would be equally pretty hanging in a window. Contact paper is da bomb!
While on a January organizing kick, I stumbled upon a paper bag of cut-out hearts that I made last year for a playdate party, and thought I'd invite him to make an easy place mat for the table.

This would be equally pretty hanging in a window. Contact paper is da bomb!
Subscribe to:
Posts (Atom)

